Software Updates – Pronto For Windows
Small improvements and additions are continually being made to the way Pronto is used to analyse and support data. Every new purchase entitles the user to a period of free updates. To arrange a software update, please contact your distributor.
Note 1: Users with Pronto for Windows 5.50 and later can use the web update utility PmUpdate.exe installed with Pronto to retrieve the latest software updates (internet access required).
Note 2: Short online tutorials have been produced, particularly for significant Pronto enhancements related to release 6.0 (and later). To view the tutorials, click here.
Current Version
The current Pronto release is 6.38 and was released on 8th April 2026.
For a detailed revision history please refer to the Knowledge Base.
Recently Added & Enhanced Features
The following recent additions and enhancements are explained below. For further help and a detailed ‘How To’ on any of these topics, please refer to the Help in the Pronto for Windows software.
- 06/03/2011 – Enhancement to ‘Graph Template’ functionality.
- 05/01/2011 – Enhancement to ‘Arrange Axes’ functionality.
06/03/2011 – Enhancement to ‘Graph From Template’ functionality
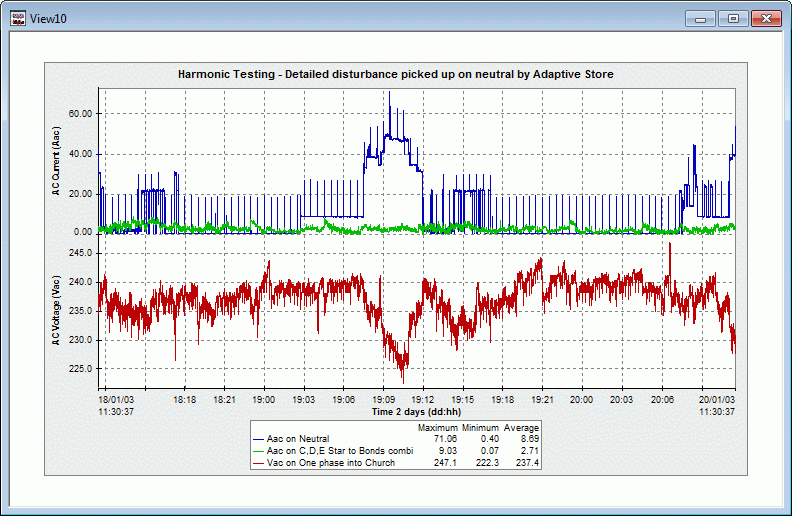
Pronto allows a great deal of flexibility when it comes to setting up a ‘view’ of one or more graphs, tables, text annotations, etc. The example below is a typical view with a single graph. The graph title, shading, colours, traces, and axes arrangements have all been customised. This view can be saved as a template and then recreated exactly with new data.
In particular, the template selection process (screen shot below) has these features:
- Create your favourite graphs and views for data in any project with just a few button clicks.
- A fully browsable and organisable tree of templates.
- A traffic light system (green/amber/red) showing whether there is a full, partial or zero match between the data streams used in the template and those available in the currently open project.
- A preview box showing a thumbnail image of the view layout as well as the view title, description and the data streams that are used.
- Templates can easily be copied and distributed to many systems, or referenced from a network location by any number of PCs.
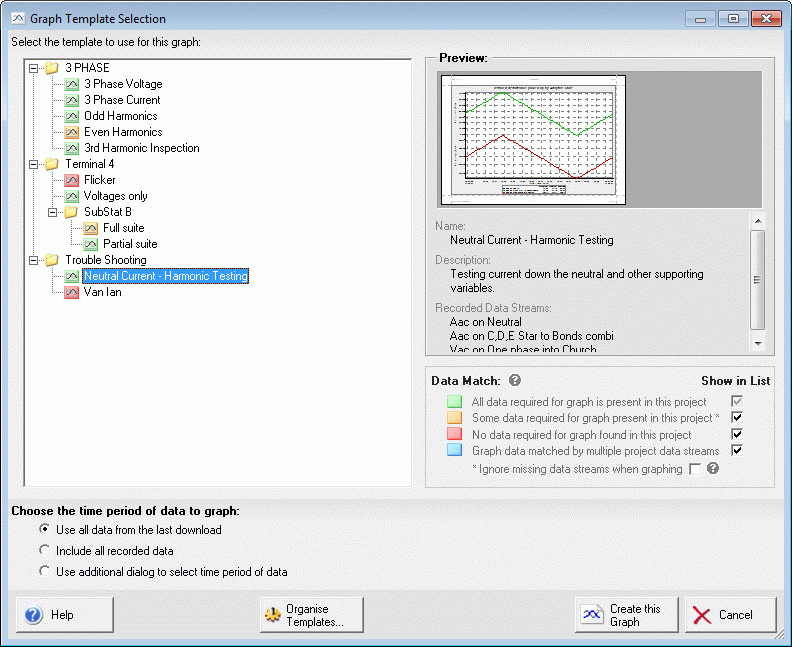
For further help and a detailed ‘How To’ on graphing from templates, please refer to the Help in the Pronto for Windows software.
05/01/2011 – Enhancement to ‘Arrange Axes’ functionality
Pronto allows data traces (lines) to be displayed on multiple y-axes per graph. The y-axes can then be arranged on the left of the graph or both the left and right. The y-axes can also be stacked one on top of the other or arranged side by side.
With a ‘drag and drop’ list of axes and traces, and a preview image of what the graph will look like, the enhanced ‘Arrange Y Axes’ dialog (shown below) allows quick and easy setup of traces on multiple y-axes. In particular, the dialog allows:
- Traces to be moved to new axes or between existing axes (provided the units are consistent).
- Axes and traces to be renamed.
- Erroneous axes and traces to be deleted.
- Axes to be arranged on the left axis or evenly split between the left and right axes.
- Axes to be stacked (one on top of the other) or not (axes are full height and arranged next to each other).
- Orientation of all the axes titles’ text can be set to horizontal, up or down, to get the right balance between space usage and clarity.
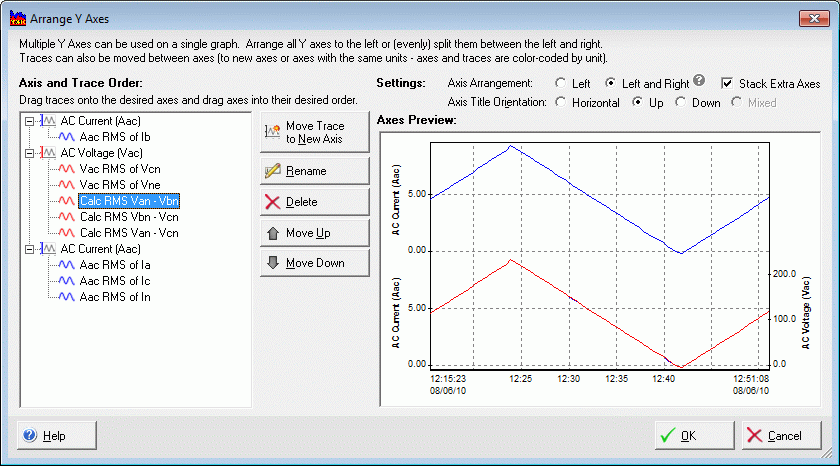
Two ways to bring up the ‘Arrange Y Axes’ dialog are:
- Select the graph whose axes you wish to arrange and select ‘Arrange Axes…’ from the ‘Format’ menu.
- Right click on a graph axis (not title) and select ‘Arrange Axes…’ from the bottom of the drop down menu.
For further help and a detailed ‘How To’ on Arranging Axes, please refer to the Help in the Pronto for Windows software.