We shall continue including more questions as they arise but if you still can’t find the answer you are looking for, please don’t hesitate to visit our contact us page and get in touch. You never know, your query might help someone else in the future.
PM1000
- When I get to site my PM1000 will not start recording. Why might this happen?
Has your unit been on charge since you last downloaded your data?
Although it is better for the unit to be kept on charge (see FAQ above), because of the easy ‘plug and play’ action of the PM1000, a new recording is automatically started whenever you plug it in, even if it’s just to charge it up. As a fail safe mechanism, so that you don’t accidentally record over any vital information yet to be downloaded, this means that if it has been on charge you must empty the memory or at least download the data before you go out to site.
NB. You can actually stop it recording automatically using PMScreen if you want to (via your computer using the infra-red cable or Bluetooth comms).
If you have a Bluetooth compatible unit (available as an upgrade) and a Bluetooth enabled portable device (laptop, smart phone, tablet or PDA), you can delete this previous recording on site, otherwise you will need to communicate with your PM1000 using your computer or laptop via the infra red cable. Simply delete the data in the unit or download and save it if you’re not sure it wasn’t someone else’s recording! Then, if you’re already plugged in on site, start the recording manually via PMScreen or if you’re still in the office, take it to site and start it as normal i.e. do nothing, just check for the green flashing lights!
Have you given it long enough to charge up slightly so it can automatically start its recording?
If you have left the unit on a shelf for a long period of time without charging it, it might take a few minutes to come back to life again. Once the unit is plugged in and the battery has reached a reasonable level of charge, the lights on the front of the unit will start flashing again.
You might have to wait a minute or two for this to happen. Once they do, check the green lights are flashing appropriately as your recording should then start up automatically.
- What is the best way to manage the batteries in my PM1000?
Please find below our guide to PM1000 Battery Maintenance
The PM1000 is not primarily a battery operated instrument. It is designed to be on charge all the time even when stored on the shelf, using the mains lead or a charger.
The purpose of the batteries is to give a ten minute ride through should the power go down and to preserve the data for a realistic period when the power is removed and the unit is off. The unit is normally powered off the voltage being measured.
The main charge rate for the PM1000 is slow, 30 mA. This is the maximum rate we can use to meet the safety standards. It is also the maximum rate which can be sustained indefinitely without over charging the rechargeable batteries. Therefore to charge the PM1000 fully from a flat state will take several days.
To see if it is charging correctly, using PMScreen through Pronto or your protable device (e.g. Android smart phone) if your unit is Bluetooth compatible, go to ‘Configure’, ‘Utilities’, ‘Manage Battery’, ‘Test charge circuit’ and wait for it to give you a charging value for the Low and High rates. A fully charged unit will read about 5.4 Volts.
The fact that the batteries are completely flat (we consider flat to be < 4.8 V) is not catastrophic for the unit but will increase the drain on the clock battery, which will eventually need replacing. (Data will be lost if the batteries go below about 4.5V). However the batteries should from full charge hold the data for about two months at room temperature.
When the batteries are nearly flat the operation of a charge accumulator will force the unit to shut down to stop any more drain on the batteries and leave enough charge to hold up the data. Once the unit is plugged in and the battery has reached a reasonable level of charge, the lights on the front of the unit will start flashing again. If the unit has bveen off charge for a long period of time, you might have to wait a minute or two for this to happen.
Note re: the Clock Battery. This applies to PM3000s and PM1000s.
In the first place the clock runs from the main battery but the main battery will go down if the unit is left off charge. When that happens the clock runs off the clock battery.
The main battery can be recharged but the clock battery cannot. So if a unit is put on the shelf and left charged the clock battery keeps going for longer but if the unit is left for a long time without being charged then it will start to drain.
Our UK distributor, as a maintenance support service, changes the clock battery in the PM3000s and PM1000s he deals with once a year. To note, since the early PM1000 models we have extended the life of the clock battery by 2-3 times.
In conclusion, from a management point of view, we advise that customers keep their units on charge when not in use and when they are serviced change the clock battery at the same time, at least every three years and for peace of mind every year.
- My PM1000 is taking a very long time to start. Is there anything I can do to improve this?
This is most likely due to low battery power, meaning that the logger has to power up the rechargeable batteries before it can start recording. So to remedy this problem, charge up your logger before taking it on site. It is important to say at this point that our loggers are not primarily battery powered, they run off the supply being measured. They are designed to be left on charge so they are ready to use at any time. If it’s not possible to keep them on charge all the time, then we recommend at least one week in every month.
If the units are not kept on charge then the batteries do discharge, and when the main battery charge is low, this will force the little button cell to power the clock. Keeping the units charged is an important part of maintenance. Also, remember that temperature is the enemy of batteries, so letting the units stew in hot vehicles doesn’t do them any favours.
The Lithium button cell batteries could be changed about every two years to ensure top performance of the logger.
If you are keeping your unit on charge and this is still happening then please contact us and we’ll try our best to solve your problem.
- What’s the best device to use to communicate with my PM1000 by Bluetooth? I would like to use a smart phone – Is there any software available?
You can use any smart phone or tablet that runs Android or Windows CE version 6.5 or above. This is to enable our program PMScreens to run. If you would like us to advise you on an appropriate piece of kit, please contact us and let us know your requirements.
In order to upload PMScreens onto your own smart phone or tablet, please follow this link to the relevant Application (App) Note in our Knowledge Base: Installing PMScreen on an Android Device or the FAQ: How do I load PMScreen……
The file to load can be found in the Pronto4w directory that is copied onto your PC when Pronto for Windows is installed.
PM2000
- I’ve dropped my PM2000 and the batteries seem to be dead. How do I dismantle my PM2000 to check them?
N.B. If this has happened to your logger and you would prefer not to check the batteries yourself but to send the unit back for a maintenance check, please contact either us here at Outram Research or sales@synergy-mi.com, your distributor for cost and delivery details.
The dismantling instructions you need can be found on our knowledge base. There are further notes regarding battery checks below, however to get into your PM2000 please follow this link.
If the unit has been dropped heavily, it might be worth making sure the battery clips have not bent so as to “only just” make contact. You can bend them in slightly if you wish but don’t be too rough.
If you want to check the charging electronics and are comfortable using a serial terminal, connect to the Logger using TermView (instructions are here) and at the Prompt send the DIAGCHARGE command.
PM2000> diagcharge.
This will give 20 lines showing the charge going into or out of the batteries. A typical PM2000 gave this output:
PM2000> diagc
PM2000>
N.B. Reaction to Current boost is on the FOLLOWING lineCurrent BoostVolotage On Charge ResistorCharge CurrentVPSU RegulatedCharge SenseV BatteryCapacity %Temp degCCharge Acc1+0.533+0.095+6.774+6.241+4.620+0.+24.4621+0.533+0.095+6.778+6.245+4.629+0.+24.4621+0.541+0.096+6.786+6.245+4.630+0.+24.4621+0.541+0.096+6.786+6.245+4.634+0.+24.4621+0.540+0.096+6.786+6.246+4.640+0.+24.4621+0.538+0.096+6.786+6.248+4.640+0.+24.4621+0.539+0.096+6.786+6.247+4.640+0.+24.4621+0.541+0.096+6.786+6.245+4.640+0.+24.462Your PM2000 should be similar, however we would expect the voltages to be higher as this logger has been left uncharged for a couple of months and its batteries are effectively flat.
As long as ‘Voltage On Charge Resisto’r and ‘Charge Current’ are positive (around 90 or 30 mA for fast or slow charge) then the circuitry is ok.
PM3000
- What happens if I stop a 7 day recording after 24 hrs and start recording again with the same settings?
All that will happen, if you haven’t downloaded and erased the data after your first recording, is that the detail you get during your second recording will be reduced versus the first. For a couple of recordings this is probably alright, but more than that, i.e. if you continue to do this for a week, then you significantly reduce the level of detail recorded during the subsequent recordings.
At the beginning of any recording your PM3000 will work out what level of detail is ‘allowed’ in order to deliver consistant detail over the entire length of the recording. This level of detail is based on how much memory is left in the unit for that recording.
If you start recording with a PM3000 with full memory available, for 7 days, it will allocate approx 1/7th of the total memory per day. If you stop the recording after 1 day, it will have used up approx 1/7th of the total memory available. If you then restart the recording, without erasing that first set of data, then you will have 6/7ths of the original memory available for your next recording. Again the PM3000 will try to allocate the available memory evenly over the recording period so this time, rather than allocating 1/7th of the total memory of the unit, it is allocating 1/7th of the remaining memory for each day of recording, i.e. 1/7th of the 6/7ths left.
At the beginning of the week this doesnt matter but if you continue to record for 1 day at a time without changing the recording set up (of 7 days), the remaining memory will continually be reduced by 1/7th during every recording. The more you record like this the less detail you will get on your recordings.
Our advice, if you are going to stop the recording every day, would be to set it for 24hrs and download the data each time. That way you get the same high level of detail during every recording. Otherwise leave the recording for the 7 days then download it and view either as a whole week or each 24hrs on their own later on in Pronto, the software that comes free with your unit.
- Can the PM3000 interface to my network?
Yes it can. We can provide an Ethernet to Serial converter to enable your PM3000 to connect to your network. We’ve had a lot of success with Moxa DE311, just ask us for one.
- My PM3000 batteries seem to be losing charge faster than they ought to. Is there anything I can do about this?
Please find below our guide to PM3000 Battery Maintenance
- The PM3000 is not primarily a battery operated instrument.
- It is designed to be on charge all the time even when stored on the shelf, using the mains lead or a charger.
- The purpose of the batteries is to give a ten minute ride through should the power go down and to preserve the data for a realistic period when the power is removed and the unit is off.
- The unit is normally powered off the voltage being measured. If only current is to be measured you must use a 12 volt charger plugged into the mains (or other form of power e.g. car battery) to charge the system.
- The main charge rate for the PM3000 is slow, 30 mA. This is the maximum rate we can use to meet the safety standards. It is the maximum rate which can be sustained indefinitely.
- So to charge the PM3000 fully from a flat state will take several days.
- To see if it is charging correctly go to ‘Configure’, ‘Utilities’, ‘Manage Battery’, ‘Test charge circuit’ and wait for it to give you a charging value for the Low and High rates. A fully charged unit will read about 5.4 Volts.
- The fact that the batteries are completely flat (we consider flat to be < 4.8 V) is not catastrophic for the unit but will increase the drain on the clock battery, which will eventually need replacing. (Data will be lost if the batteries go below about 4.5V).
- However the batteries should from full charge hold the data for about two months at room temperature.
- When the batteries are nearly flat the operation of a charge accumulator will force the screen to shut down to stop any more drain on the batteries and leave enough charge to hold up the data. Once the unit is plugged in and the battery has reached a reasonable level of charge, the screen will once more light up. This means that after the screen has ‘closed down to save batteries’, it will not necessarily come alive immediately it is plugged in.
- How long can a PM3000 record for?
There is no definitive answer to this question as the variable is the detail you record, not the length of recording. One of the first things you do when setting up your logger is select the time interval.
As an example, you can ask it to record for a week or two, or if you have requested extended memory you could ask your PM3000 to record for 2 months and still get down to single cycle detail during disturbances.
Our intelligent storage technique Adaptive Store, which all of our loggers have, will then share out the memory it has available over the period and give more or less detail depending on how much memory you have allocated and the number of channels selected. Anomalies will still be recorded in relatively more detail but the trend data will become less detailed as the recording period gets longer and the number of channels increases. Allocating more memory (possible in a PM7000) or choosing once of our memory extension options (8MB, 16MB, 32MB, 64MB) will enable the unit to give even more detail over a longer monitoring time.
Adaptive Store is an intelligent compression mechanism with a 25 – 200:1 compression ratio.
The question asked is how long can the PM3000 record for? WIth the standard 1MB model, if you only select 1 channel it will give you about 50 days of detailed results. If you select 16 channels it will give you a week of detailed results, down to single cycle when anomalies occur. There will always be a trade off of length of recording, number of channels selected and amount of variation in activity versus the resolution of the recorded data. The Adaptive Store ‘adapts’ to what is going on.
As mentioned previously, we now have 4 new members of the PM3000 sub-family. The 8MB, 16MB, 32MB and 64MB memory models. More memory means more detail for longer, on more channels. This can offer enhanced profiles of dips, sags, surges and overall harmonic levels etc. as well as providing better resolution for phenomena such as Instantaneous Flicker Sensation.
Existing customers may be able to retrospectively upgrade their units.
PM7000
- Is the frequency measurement in the PM7000 derived from the V or I signal?
The PM7000 can track using any of V1, V2 or V3. V4 or the current channels are never used. The analyser will use V1 unless V2 or V3 are more than twice as big. Also if the selected channel has less than (about) 4 volts rms then no frequency tracking is done, the PM7000 will keep running at the last known frequency.
This answer applies only to the PM7000, there are minor differences for the other products.
- When measuring off a secondary VT at 110 volts, I have got a message saying that a fuse has gone on my PM7000. Why is this, how do I avoid it and how do I put in replacement fuses?
This may be due to a blown 325Amp fuse in the power supply board. The VT voltage is probably sourced from a relatively high impedence so when even a modest load like the PM7000 draws current it may take a while for the voltage to get to where it should be. If this is the case the current goes up and stays high for a period. The fuse rating is recommended by BSI which means we are not allowed to choose one with lots of margin and as fuses from the manufacturer are allowed a performance range, some may react and therefore ‘blow’ unnecessarily quickly if the higher current is prolonged.
Unfortunately the safety standards won’t allow us to use a higher rated fuse so we now provide extra fuses in the kit for any eventuality while monitoring at lower voltage (110 volts).
The procedure for changing the fuses is found in the PM7000 manual or in the Knowledge Base in the article: Replacing the fuses in the PM7000.
- Can I connect multiple PM7000s together across a site, so they all measure the same voltage inputs but different current inputs?
Yes, you can. In terms of placement we would recommend keeping the loggers close to the current sources and extending cables between the loggers and the voltage source.This is because you will be dealing with much smaller voltages through the CTs than through the PTs (remember the logger measures current by transforming it to voltage through the Rogowski coils or low current CTs). These small voltages will be more susceptible to common mode voltages that might be generated from any magnetic fields around your site. Since our voltage inputs are differential our common voltage rejection is good however we also recommend connecting the loggers via twisted cables (we recommend silicone coated) to reduce the potential for common voltage.
A distance of 10m along a cable should maintain relatively good readings but be aware that if you are increasing the length of interconnecting cables at all, the longer the connecting cables, the progressively worse the quality (noisiness) of your recording will get.
- How long does the PM7000 stay in ‘discovery mode’ for Bluetooth operations?
The PM7000 stays in ‘discovery mode’ for Bluetooth for 1hr. It is stimulated and woken up by lifting and closing the lid on the unit. The Bluetooth LED on the top panel will flash twice every 4 seconds to show that the Bluetooth is awake, then once connected that light will remain on. If the logger is on mains power or charger power the Bluetooth will stay on all the time.
- I can’t seem to find my copy of the Product Manual anywhere. Where can I find it?
The Product Manual, the PM7000 Start Guide and the Hook-up Checklists are all available on the Pronto for Windows Software and Marketing CD included with your analyser kit. If you no longer have this CD please contact us for the latest copy of the Product Manual.
- Where can you find the symmetrical component function on the PM7000? We have a negative sequence network, so when set up, we get an error message saying the PM7000 might not be connected correctly when we know it is.
If you think this is the reason for the error message then try swapping any two phases over. You should see NPS/PPS Unbalance of no more than a few %. NPS/PPS Unbalance can be seen on PMScreen on ‘General Parameters / Live’ and under the ‘3 phase AC power’ functions. This is the one function which is sensitive to direction.
- What do the LED colours on the top of the PM7000 correspond to?
The LEDs are used to show the status of each of the inputs, according to the hook-up (not counting the top right LED which shows that recording is taking place).
The 6 LEDs are in two columns of 3, Voltages on the left, currents on the right, with phases A,B,C corresponding to V1 V2, V3 from top to bottom.
Green = signal big enough to be measured, phase angle is good. Since the top left LED (V1 = Va) is used as the phase reference, this is always green while signal is present.
Orange = signal is big enough, but phase angle is suspect.
Red = signal is big enough, phase is reversed.
None = signal is turned off or is too small to give a meaningful phase measurement.Thus if all signals are big enough and hooked up correctly so that all phases are correct, all the relevant LEDs will flash green. If one of the current sensors is reversed, the processor can detect that, and the corresponding LED will flash red. When the phase is neither good, nor reversed, that is when it will flash orange. So the orange means “It’s not good enough, and it’s not obviously reversed, so I don’t know what it’s supposed to be”. The tolerance on phase is +/-30 deg.
If the phasor diagram on PMScreens says the connections are good, then the relevant LEDs will flash green. (The same phase angle measurements and decision making processes apply to both the LEDs and the PMScreens front screen.)
For more help on hooking up your PM7000 please use our PM7000 Hook-up Checklist in European Union, USA and Asian phase colours
- Can I use PMScreens to check or change the settings in the PM7000 remotely via Ethernet? Also, is it possible to download the recorded session via Ethernet too?
Yes you can. The PM7000 Ethernet connection uses “COM port redirection”. To configure this we have an in depth article on our knowledge base called ‘Connecting to a PM7000 over an Ethernet network‘. You can use this to set up your analyser.
Once configured you will be opening a port, for example COM6, and talking to the analyser using Pronto or PmScreen as if the analyser was directly connected. You can therefore change settings and download data as if you were in the room with it.
- How do I set up Waveform Capture Extension?
Normally to set Waveform Capture Parameters you would do so on the screen shown to the right in PMScreens. To get here from the home screen click ‘Main Menu’, ‘Configure’, ‘Waveform Capture’.
In order to set Extended Waveform Capture (to allow recordings of the waveforms for up to 60secs) you need to go one step further. On this screen click on ‘Set…’ (bottom right hand corner).

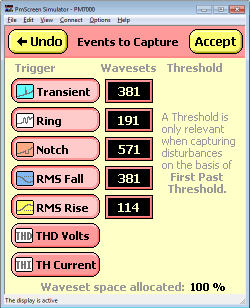
Then you can select the extension you would like for each different type of event. E.g., click on ‘Transient’, then on ‘Off/1638 evts’ (this number may vary depending on memory allocation to Waveform capture).
This is the screen to set how long you want your extension to be. Typically this would be for 0.5 or 1 sec, rather than the whole 60 secs, as you limit the number of extension recordings, the longer you record the waveforms for.
If you click within the bar at ‘.5’ to extend the green bar, it indicates that you can record 327 events with the extension.
Click ‘Accept’ and then try another, for example, by clicking on ‘RMS Fall’. It then splits the total no. of waveforms collected between the two types of event.
Click on ‘Off/819 evts’ and extend the recording to 0.5 secs by clicking within the bar at ‘.5’.
In the bottom right hand corner you will then have the option (for RMS Fall and RMS Rise only) to ‘Truncate extension on recovery from the fall’. Click on the green button (‘Off’) to switch it to ‘On’ if you’d like to. This means that the waveforms will stop recording when the Sag is over, therefore being economic with memory.
Click on ‘Accept’. At this point you can continue with any other types of event or click ‘Accept’ again and you’re back where you started.
- Having worked out the right hook-up to use, I’m struggling to get my wires hooked up in the right way to get correct recordings. Is there anything available to help me?
You can download our Hook-up Checklist which is available in European Union, American and Asian phase colours. We’ve included photos of what the logger and all the wires should look like as well as examples of vector diagrams and LED displays to give you confidence that you’ve hooked your analyser up correctly.
It could also be the case that your wiring may not be what you’re expecting. If you’re convinced that you have hooked up the logger correctly take a look at the phase angle summary. Check that your phases are correct and that your CTs or Rogowski coils are facing in the right direction.
If you are using a rogowski coil, another thing you could do is to check that you have selected the correct current sensor on PMScreen. To do this go to ‘Main menu’, ‘Configure’, ‘Input signals’ (bottom of screen).
We normally try to sort out the voltages first and then, mindful of the load currently being measured, try to match up the currents. (Note motors offload may cause the current to lag the voltage significantly, by 50 ° or more.).
It might be a case of trial and error. Good Luck!
Pronto
- If the power factor is recorded as a positive value throughout the recording how do I identify whether Power Factor is lagging or leading?
The Power Factor is approximately* equal to the cosine of the angle between the volts and current. The cosine of the angle remains positive when that angle is either positive or negative, so the Power Factor will be positive irrespective of whether the reactive power is leading or lagging (if it’s within 90 degrees). If the current is reversed, then the Power Factor will also be reversed.
Generally, if the Reactive Power is positive, you can deduce that the Power Factor is lagging and vice versa.
(*approximate if there are significant harmonics)
- How can I convert an RMS harmonic current value into a percentage value in Pronto?
Although the harmonic current percentage is normally perceived to be less useful than the value it is possible, in Pronto for Windows, to view the RMS harmonic current as either a value or percentage.
Although individual harmonic currents are imported into Pronto from the Analyser by default as values in Amps, the Total Harmonic Currents are available to view on a graph or table as percentages.
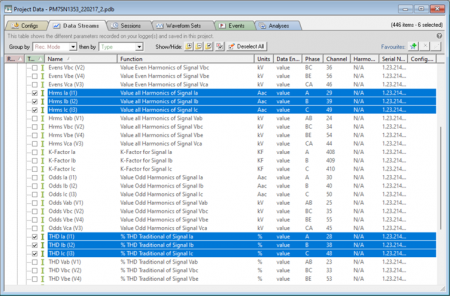
In Pronto for Windows, navigate to the Data Streams tab, then in the ‘Group by:’ drop-down menu, select ‘Rec. Mode’ (recording mode). Look under ‘Interval (GP)’, then in sub folder ‘Harm. Group’ you will find THD Ia, THD Ib, THD Ic as a percentage value (shown in picture below) as well as Hrms Ia, Hrms Ib and Hrms Ic as values.
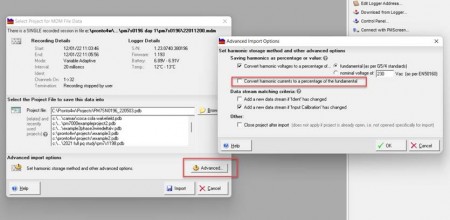
If you want the individual harmonic currents as a percentage of the fundamental you can alter how the data is initially imported into Pronto (i.e. when importing an MDM file). Click on ‘Advanced’ during the import process and select the box in red, ‘Convert harmonic currents to a percentage of the fundamental’, as per the picture below. You should then get the percentages of the fundamental in your list of Interval Parameters (GPs) rather than the values of the individual harmonic currents.
- Although it’s worked in the past, I’ve now got a problem with your software update facility, PMUpdate, on my new computer. How do I fix it?
Recently we’ve noticed a problem with some of the new anti-virus checkers that have been coming out with new computers. We’ve fixed the problems with ones we know about, so do try the download again, but your new version of anti-virus may have slipped through the net. If you are having a problem updating your version of Pronto via the web please review our APPNOTE: Known issues running PmUpdate, the web update utility, in our Knowledge Base to help you solve your problem.
- My Functions Panel has disappeared in the new version of Pronto. Can I get it back?
Any version of Pronto for Windows starting with 6. will have a screen specific Functions Panel which appears on the right hand side of the screen. If for any reason this has disappeared you can switch it on again by clicking on ‘View’ in the tool bar at the top of the page and selecting ‘Functions Panel’. This will bring it back into view.
- Will the Pronto CD I received with my original kit still work if I upgrade my computers to Windows 7?
On your Pronto for Windows CD, there is a number on the front showing which version it is.
Releases 5.64 and later of Pronto for Windows will install and run correctly on Windows Vista or Windows 7. When Pronto is open you can update your version of Pronto to the latest by running PmUpdate (via the internet). From the tool bar at the top of the page select ‘Help’, then ‘Check for Updates’ and follow the Update Assistant.
Releases 5.50 to 5.64 will also need to be updated (via the internet) by running PmUpdate, however you will need to run PmUpdate from the Pronto installation folder on your computer rather than through Pronto itself. Please follow the steps below:
1. Install Pronto off your CD, however, during the installation process when you reach the ‘Set Destination Folder’ screen of the installation assistant, you MUST save Pronto into the directory ‘C:\Pronto4w’ instead of the default ‘C:\ProgramFiles\Pronto4w’. Otherwise you will encounter problems with write access.
2. Before you open Pronto, run PMUpdate which is found in the Pronto installation folder (‘C:\Pronto4w\PmUpdate.exe’).
3. Choose either the most up to date classic version of our software or our new generation of software with many new and exciting features (currently a Beta, as of 2nd December 2013). Both will work well on Windows 7.Releases prior to 5.50 do not have this upgrade function and will not work on Windows 7. Contact us for a copy of the latest release.
For more information take a look at the Application (App) Note Computer Requirements to run Pronto for Windows in our Knowledge base.
- Is it true that I can get Pronto upgrades for free at any time?
Yes, any user with a legitimate version of Pronto for Windows* (version 5.50 or later) can get unlimited upgrades through the web update utility PmUpdate.exe installed with Pronto to retrieve the latest software updates (internet access required).
In Pronto, from the tool bar at the top of the page select ‘Help’, then ‘Check for Updates’ and follow the Update Assistant.
Exception: If you have Pronto 5.50 you will have to go through the folder system on your computer to get your update as it is not available from the drop down menu in the software itself.
If you are having any problems with you update please do contact us or visit our knowledge base page ‘APPNOTE: Known issues running PmUpdate, the web update utility.‘
*Hire customers may have a time limit imposed on their version on Pronto for Windows
- In Pronto, how do I scroll quickly through each of my recorded waveforms?
When you first open Pronto, open the relevant project you want to analyse. Select (highlight) the datastream with the waveforms you wish to view e.g. Input Van (V1) (Transient) and create your graph using the Graph Assistant. On the second step of the assistant you can select ‘Zoom To: Waveform’ as circled below. (In previous versions of Pronto the term to select is ‘AC Snapshot’ if Waveform is not available).
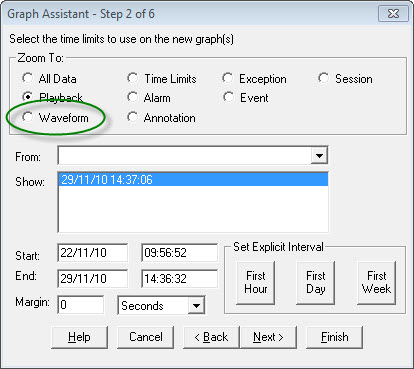
(Pronto is currently going through a fairly major facelift so will look slightly different in very new versions. The principle though is still the same.)
Either complete the steps with the Graph Assistant or click on ‘Finish’. The graph you will see (unless a different one has been selected) will be of the first waveform caught during your recording.
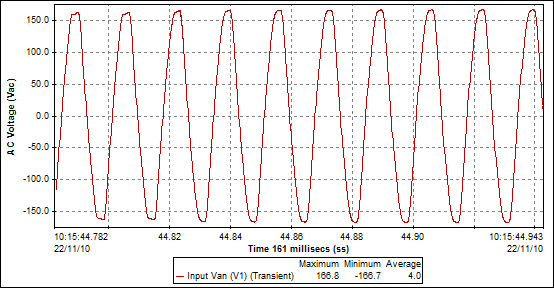
To scroll to the next waveform click on the double arrows in the tool bar. This will let you scroll through all the waveforms recorded on that datastream.

If however, you have already opened your graph, with all the waveforms as below, you can still scroll through your waveforms without going back through the Graph Assistant. Firstly, make sure the trace (the relevant line on the graph) is selected.
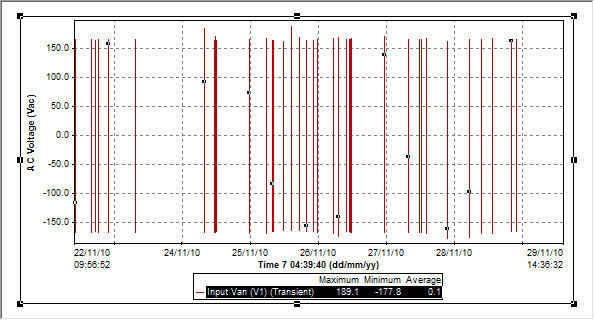
From the menus on the top of the screen, Click on ‘Graph’, then ‘Zoom…’ in the drop down menu to bring up the following ‘Zoom Graph’ assistant. Note in earlier versions of Pronto this assistant may look slightly different.
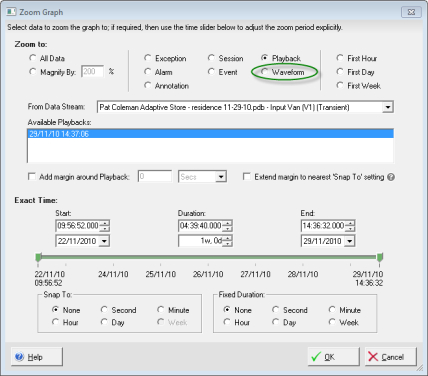
Select ‘Waveform’ (in older versions this may be called AC Snapshot). Click on ‘OK’. The graph you now see will be of the first recorded waveform zoomed in to span the entire graph. Now you can click on the double arrows in the tool bar to scroll forward and back through your waveforms.
- How do I work out a cumulative value for kWh in Pronto?
First of all make sure you have recorded Real Power (kW) as a parameter on one of your recording channels.
Once you have downloaded your data into Pronto, select this data and produce a graph of Real Power for the duration of your recording. Now you can get the cumulative results of the data shown on your graph.
Select the data stream on the graph, in this case the Real Power (kW) data stream. Once this is highlighted the ‘Sum’ icon on the tool bar becomes live, as shown below.

If you now click on this it will give you the data you require as trace statistics, the trace being the line you have selected on the graph.
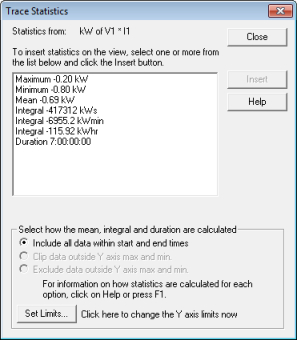
The integral kWhr value is what you are looking for. In this example the sensor was put on the wrong way round, hence the negative results. The duration of the recording shown on the graph selected was 7 days.
Note that this information will change depending on the data showing on your graph. If the graph covers a week, your results will be over the week, if you have zoomed into a particular day, the trace results will be generated from that day’s results. This way you can pick and choose exactly when (and over what part of your recording) you want your answer to originate from.
- Can I download my recorded data via Bluetooth?
Yes you can, it just takes longer than by USB, Infra-Red or Ethernet.
- How do I export graphs, tables and reports from Pronto?
All the information that you need to know in order to either COPY and PASTE your graphs into Word, print to PDF or export to Excel can be found in our Knowledge Base.
The knowledge Base can be found through our Support Overview page or you can go straight to the AppNote using the following link: Exporting from Pronto .
If you would like help creating graphs and tables please watch the relevant tutorials on our Tutorials and Videos Page.
- Does Pronto choose the correct Baud rate for each unit when it connects for download or do I have to program it manually?
Pronto will automatically choose the correct Baud rate for the logger the first time it connects with your PC. If it hasn’t for whatever reason it is possible to amend it manually by selecting ‘Create new connection settings’ in the Startup Assistant (Step 2). Carry on through steps 3 and 4 and when the ‘Select Instrument for Playback’ screen appears click on ‘Edit’. This will then give you the option to amend the baud rate for your logger.
The recommended rate for the PM1000, PM2000 and PM3000 (most of the time) is 115200 and for the PM7000 USB it is 921600, for the PM7000 Bluetooth it is 115,200. For our other loggers please refer to our knowledge base.
- What version of windows do I need in order for my computer to be compatible with Pronto?
All the information you need is in our knowledge base. Look at the Application (App) Note Computer Requirements to run Pronto for Windows for the information you’re looking for.
Pronto should run on Windows 95, however we currently only test our software on Windows 2000 and later. Regrettably we are unable to support versions of Windows before this date (Windows 2000).
- The layout of Pronto has recently changed. It looks great but since I was used to the old version, do you have anything to help me understand the new layout?
Yes we do! Phil, who has designed most of the new Pronto layout, has recorded some video tutorials to help you through the transition. There are lots of new benefits to make analysing and reporting on your data easier. Please go to our Tutorials and Videos page.
- How do I download the data from my analyser?
If you have a PM7000, the first place to look is the Start Guide on your Customer CD which has pictures and detailed instructions on how to download your data using Pronto for Windows (Eighth Step). We are actually in the middle of writing quick start guides for all of our other loggers but since the download process is similar for all of them, other users can also look at this start guide for reference. Alternatively refer to this quick overview below.
1. Install Pronto for windows using your customer CD and following the instructions.
2. When you open Pronto, the ‘Startup Assistant’ will appear.
3. Select ‘Control and/or Playback data from a logger’ and click on ‘Next’.
4. Select’ Create new connection settings’ and click on ‘Next’.
5. Select the type of logger you want to connect to.
6. Write in the COM Port or ‘Search’ to find the COM port to which your logger is connected, then click ‘Finish’.
7. Select your instrument for playback and ‘Connect’. If your logger is still recording you will need to stop it, in order to download the data. With the PM7000, you can set the logger to download in a FIFO (First In First Out) mode onto a memory stick, meaning you never have to stop recording.
8. Once the data has downloaded, you can choose where to save it. Click on ‘New’ as it is a new project, decide where to save it and do so.
9. You will then be taken back to the previous screen where you can ‘AutoSave’ or ‘Save’. N.b. If you have multiple sessions in your logger, Autosave saves all of them to the same project.
10. Good luck with analysing and reporting on your data. The Graph assistant can now help you with the next bit.There is also a good tutorial on our distributor Synergy’s website. How to Download your Power Quality Monitor
General
PMScreen
- I can communicate with my analyser from my desktop computer but I can’t pull up PMScreen When I click on PMScreen in Pronto for Windows it freezes up and I have to end the process from my task manager. Is there anything I can do?
This might happen if you have recently updated your windows system and now the version of Pronto for Windows you are using is too old. In your current version of Pronto go to “Help”, then “Check for Updates”, then click on “OK” to check for the latest updates. Installing the latest update will automatically update PMScreen You should now be fine to load PMScreen as normal.
- How do I load PMScreen onto my own Android tablet or mobile phone?
Here are the instructions how to put PmScreen onto your Android phone or tablet:
1. First of all check that your phone (or tablet) is Android 2.3 or later.
2. Then you will need to download the latest version of Pronto onto your computer via PmUpdate to get the appropriate version of PmScreen. This will put the Android file PmScreen.apk into the Pronto4w directory on your computer.
3. There are various ways of putting the file onto your phone. I’ve listed 3 below:
Note: On your phone you will need to authorise downloads from unknown sources. Under “Settings,” select “Application Settings” and then enable “Unknown Sources”. Don’t forget to switch the authorisation back on afterwards.
- On your computer copy PmScreen.apk into the root directory of your SD card, put it into the phone or tablet and search for your new app. You may need to download an APK installer or file manager onto your device from the Android Market in order to find the new file on your phone. There is an app called “Appinstaller” you can download. Once installed, click on the app. and you should see your file listed there.
- You can connect your phone to your computer via a USB lead. Open the computer explorer and navigate to the phone’s SD card and copy over PmScreen.apk. Once that’s done, safely unplug your phone and search for your new app. (Again you may need the appinstaller.)
- If you have email on your phone you can email the file to it and open and save it on your device.
4. Finally connect to your Ranger analyser as usual. Make sure Bluetooth communication is open on your phone, open PMScreen and search for the relevant COM port etc.
- How do I load PMScreen onto my own PDA/ Windows compatible mobile phone?
The knowledge base has a good Application (App) Note on how to load PMScreen onto your own PDA. For a Windows compatible mobile phone it is exactly the same process. The knowledge Base can be found through our Support Overview page or you can go straight to the AppNote using the following link: Installing PMScreen on a Personal Digital Assistant.
The file to load can be found in the Pronto4w directory that is copied onto your PC when Pronto for Windows in installed.
Harmonics
- I have loaded the new firmware into my PM7000 to enable expression of voltage harmonics to an extra decimal place, however it is still only giving me 1 decimal point. Have I not uploaded the firmware correctly?
The first thing to check in this situation is that the correct bandwidth has been selected in the analyser. In order to get the extra decimal place you must select the ‘5Hz bandwidth’ measurement rather than ‘wide band’. In PMScreen go to ‘Menu’, ‘Configure’, ‘Calculation Method’ and select ‘IEC 61000-4-7’ method to get to the 5Hz bandwidth measurement.
Note: You must have the Interharmonics option on your analyser (and have updated your firmware after Feb. 2012) in order to get the extra decimal place on your harmonics measurements.
Frequency
- Is the frequency measurement in the PM7000 derived from the V or I signal?
The PM7000 can track using any of V1, V2 or V3. V4 or the current channels are never used. The analyser will use V1 unless V2 or V3 are more than twice as big. Also if the selected channel has less than (about) 4 volts rms then no frequency tracking is done, the PM7000 will keep running at the last known frequency.
Frequency tracking is slightly different in the other products in that if no voltage is present on any channel then the Logger will track on the currents if these are reasonable.
Bluetooth
- No Loggers appear when using Bluetooth Discovery on Windows 11
Windows 11 update 23H2 hides certain Bluetooth devices during discovery on the Add a device page.
To see all devices scroll down the Bluetooth & devices > Devices page and change Bluetooth devices discovery from Default to Advanced
- Can I download my recorded data via Bluetooth?
Yes you can, it just takes longer than by USB, Infra-Red or Ethernet.
- How long does the PM7000 stay in ‘discovery mode’ for Bluetooth operations?
The PM7000 stays in ‘discovery mode’ for Bluetooth for 1hr. It is stimulated and woken up by lifting and closing the lid on the unit. The Bluetooth LED on the top panel will flash twice every 4 seconds to show that the Bluetooth is awake, then once connected that light will remain on. If the logger is on mains power or charger power the Bluetooth will stay on all the time.
Ethernet
- Can we use the Ethernet port in some way to enable communication with a cellular transmitter so I can get data remotely?
Yes. In simple terms you need to extend your network equivalent through a cellular link to create a connection. We have been accessing our own logger here though a PC gateway for some years, and another way to do it is through a local netbook running something like PCAnywhere.
However… there are security and IT department issues with doing the above and giving either the logger end access to a network, or even putting a logger directly onto the IT department’s network is verboten – so we are leaning towards using an intermediate server solution (on the internet and owned by the user) on which the logger dumps its data at the logger’s convenience, and which the user accesses at his convenience. This way neither the logger nor the users network is compromised.
- Can I use the Ethernet port to time-synchronise my two loggers together?
Yes, by using the “set-time” command in Pronto. The “set-time” command is also available in our engineering command utility Termview). There isn’t an automatic time sync. process initiated by the logger.
- Does Ethernet replace the Bluetooth module?
It does not replace Bluetooth which is more private (some big companies won’t go near Ethernet communications because of network security issues). Bluetooth is still simpler and lower power but slower.
- How do I connect my PM7000 to my computer via Ethernet?
To find out how to connect your PM7000 to your computer via Ethernet please have a look on our knowledge base at the app. note: Connecting to a PM7000 over an Ethernet network.
- What can I use the Ethernet port for?
You can use it for connecting your logger either to your Laptop, PC or your netbook. You can use it like the USB port except for upgrading (which you can’t do over ethernet). This means that it can be plugged into a local network and becomes a peripheral. The host PC software driver has to be set up to treat the logger as a serial port, so the extra COM port appears in the pronto search list just as the USB port does. Here is an application note in our knowledge base: Connecting to a PM7000 over an Ethernet network.
- What is the Ethernet Port (in the PM7000)?
Basically it is a hardware ethernet module inside the logger which gives Ethernet network access using TCP/IP. It’s a module routed to a high speed RS232 link inside the logger.
Firmware Upgrades
- How do I load the latest firmware update?
Once you have contacted your distributor, you will be sent the latest update as a .ZIP file. This file needs to be unzipped and placed into a suitable directory. We suggest you create a directory under the Pronto4w directory called /PMx000 Firmware.
To install the file into the logger, apply power to the logger and connect to it using the USB, RS232 or Infra-Red Cable. Verify you can talk to it by running PMScreen or Pronto and stop recording if it is doing so. This is simply to prove the communications path is open and make sure the logger is ready for your update.
When you are confident of communications, note the COM port being used and close whichever the application was (PMScreen or Pronto).
- Find the executable “Flashsyw.exe” under the Pronto4w directory.
- Double click on it to launch.
- If updating a PM7000 ensure the “Allow changes to Advanced settings” checkbox is ticked.
- Set all three baud rates (Initial baud, Boot code baud and Sector transfer) to the baud rate relevant to your logger: Note that the PM3000 has a choice of baud rates, we suggest you use these baud rates below and you check that your logger is also running at 115,200 baud.
PM ModelPM7000PM3000PM2000, PM1020, PM1000Initial baud 921,600115,200115,200Boot code baud 921,6009,600115,200Sector transfer 921,600115,200115,200 - Set the COM port to whichever you used to communicate earlier.
- Now click the “Browse” button and browse to the Pronto4w/PMx000 Firmware directory and click on the unzipped new firmware file, e.g. PM7000Beta1176.raw, to put this into the “File to Load” box.
- Click “Load Update”.
- This should then go through the update process (the PM7000 takes about 80 seconds to complete).
- Close “Flashsyw.exe”.
The logger should now be updated with the new firmware, which should be displayed on the first logger screen after wake-up (i.e. logger front panel).
- Do Firmware Updates exist for your analysers?
Yes they do. You can check what firmware updates are available by clicking here.
Please contact your distributor (click here for Our Partner details) or contact us in order to request the latest upgrades for your analysers.
Synchronous Recordings
- Is it possible to time-synchronise my two loggers together?
Yes, by using the Ethernet or USB connections you can use the “set-time” command in Pronto. This “set-time” command is also available in our engineering command utility Termview. There isn’t an automatic time sync process initiated by the logger.
- I would like to measure 2 loads simultaneously with synchronised clocks or use a single logger with 6 current outputs. Can you suggest what anaylser(s) I should use?
PM7000s keep their time extremely well. In addition, if two or more loggers are connected to a common origin, it is likely that the voltage variations seen on each logger will uniquely identify their clocks one with respect to another, so I recommend using 2 of our PM7000s for the job.
Recently, we had a case of three loggers a few miles apart where you could see to a tiny fraction of a cycle what one logger was doing with respect to another. This arises from the Adaptive Store (and Waveform Capture) processes which saw the same fast events on each logger, and consequently the timing relationship could be seen easily. From that data we could readily determine that the three loggers remained within 1/2 sec of each other over a month.
Remote Cellular Communications
- How do I manually input the APN of my telecoms provider if it doesn’t come up automatically?
For future versions of PMScreen, this setting will be able to be entered into PMScreen’s user interface.
- What type of antennas can I use with the Cellular PM7000?
The supplied antenna is a half-wave omni-directional antenna with a magnetic mount and three metres of low-loss coaxial cable.
Other antennas can easily be fitted to the PM7000, either by connecting to the female SMB present on the Logger, or by using an adaptor for a different connector.
NB: When choosing a different antenna, it must operate on the LTE bands used at the Logger’s location.
- What should I do if I’m not getting any signal?
- Check the connection and placement of the Antenna – this should be vertically mounted and ideally should have a clear view in the direction of the nearest Cat-M1 mobile mast.
- Check the Cat-M1 coverage for the chosen mobile network operator (this information is often available on the mobile network operator’s website).
- How long does it take to retrieve data from my Cellular PM7000?
The Logger checks for new recording sessions every 2 minutes, then any found are uploaded to the server at PMGateway.online. The time taken to upload depends on the size of the recording file and the speed of the mobile link. As an example, an 8 MB recording with a 300 kb/s mobile link would appear between 4 and 6 minutes after the recording finished.
- What remote communications are available in the PM1000, PM2000 and PM3000?
All of our family of analysers can communicate remotely from their measurement point using Bluetooth communication, via our PMGateway mobile app.
The PMGateway app (not the same as the PMGateway.online portal) can be uploaded onto an Android mobile phone which is left on charge within Bluetooth distance of the Power Quality Analyser. PMGateway can download the recorded data from the logger to the phone and send it directly to a specified email or Dropbox account.
- Integral Cellular Remote Communication is available in the PM7000, PM4000 and PM7000 Fault Level Monitor
This cellular remote communications offering is available in PM7000s, PM4000s and the PM7000 Fault Level Monitor as well as their derivatives. Cellular Remote Comms is available in new units only.
- Can I put PMGateway onto my own company server?
This is part of the long term plan. At the moment, PMGateway.online is only available on our managed and secure AWS server, however we are aware that utilities like to be in full control of their own data at all times. Although we are more than confident that our site is secure, we are planning on making it possible for larger customers to put PMGateway.online onto their own servers in the future.
- In which regions/countries is this remote communications option available?
So far we have tested our Remote Comms PM7000 Analysers in the UK, USA and New Zealand. We have no reason to believe they should not work anywhere else where there is a good Cat M1 network. If you are interested in buying a Remote Comms PM7000 for use a country not listed here, please get in touch and we can look into how best to verify connection.
- What is PMGateway.Online?
PMGateway.online is the secure web interface with which to view and communicate with your Cellular Remote Comms units as well as accessing your data online. Start, Stop and Restart your remote logger as well as update the logger configuration from this platform. As soon as a recording is finished the data is uploaded to the site ready for you to download to your PC, phone or tablet.
For online viewing of the latest onsite measurements the user can interrogate their analyser, via PMgateway.online, for any of the selected Adaptive Store (detailed) recording channels set up (choosing up to 32 of the 100s of different parameters available when setting up the logger). For more detail on the (up to) 1000s of other measured parameters, simply stop your recording, wait for the data to be uploaded automatically to the site and with a few clicks download it to your PC for analysis using our software Pronto for Windows, which comes as standard with the purchase of any Ranger / Outram Analyser.
- Isn’t remote data transfer very expensive?
We anticipate around 8MB data per day for a good level of detail in your recording, but that is entirely up to the user. The cost of that data will depend on the data plan agreed with the preferred telecoms provider. Outram or their distributors can assist in organising a SIM and data plan if required.
- Why CAT M1 (LTE-M)?
Having considered various options, Outram decided on Cat M1 for a few reasons:
- Cat-M1 and NB-IoT are considered future-proof and are viewed as 5G technologies. They can also efficiently co-exist with 5G NR (New Radio) in the same spectrum. With this in mind, both NB-IoT and Cat-M1 devices can sleep for extended periods of time with extended Discontinuous Reception (eDRX) and Power Saving Mode (PSM) functionalities, which greatly reduces device power consumption, an important consideration. Furthermore, both technologies support enhanced signal coverage per base station.
- Utilising wider bandwidth than NB-IoT (1.4MHz vs 200kHz) allows Cat-M1 to achieve greater data rates (up to 1 Mbps), lower latency and more accurate device positioning capabilities. With the need to send datafiles over the network we decided Cat1M was the one to use.
- Large telecoms carriers in the US and in Europe have already started shutting down (sunsetting) their 2G mobile network service and are anticipating the shutdown of 3G in the near future (if they’ve not already started). Any products that use these networks for their communications will soon become obsolete. Whilst CAT M1 (LTE-M) may not have the coverage of some of the more established mobile networks (2022), international coverage is increasing all the time.
By utilising the Cat M1 network, we have future-proofed our products so that investments made in our kit now can pay the customer back well into the future.
- Can I keep track of where my Remote Loggers are?
The location of the unit is identified based on local phone masts and can be viewed on PMGateway.online.
You can keep track of your loggers and their whereabouts once they’ve been installed, making your logger management much more straightforward. Double click on the location pin to select that logger meaning you do not have to remember which logger has been installed where.
- Why should I use remote communication in the PM7000?
Unnecessary site visits are one of the most costly expenses for electrical maintenance, surveyors or customer management teams. Paying not only for the power quality engineer’s time but truck maintenance and mileage each time you go to site adds up. Being able to download data remotely any time or anywhere allows the user to check the data recorded before heading back to site to collect their unit. Why not confirm they have the right data before heading back out to site and significantly reduce the number of unnecessary visits? If the event they have been waiting for has yet to occur or the data is not as expected, then leave the analyser recording or restart it using a different configuration and leave it running until all the necessary data has been collected.
- What is Remote Cellular Communication in the PM7000?
Remote Cellular communication in the PM7000 and its derivatives (e.g. the PM7000FLM) is via an integrated (built in) modem within the unit itself. The user inserts a CAT M1 SIM Card (widely available from telecoms vendors) into the ‘house’ on the front panel of the unit. The SIM is then authorised using the Power Master Series user interface PMScreen to communicate with the server and send measurements remotely and automatically once they have been recorded.
The user can start, stop and restart recordings as well as interrogate their analyser for the latest readings taken on any of the selected detailed recording channels available (up to 32 different parameters measured using our unique Single Cycle Adaptive StoreTM process). The thousands of other possible measurement parameters are available in the full recordings available for download. Once a recording has been stopped or restarted, the most recent recording will automatically upload to the server ready for you to download and analyse.
Update and change the analyser configuration through the PMGateway server with any previously saved configuration to continue to gather the most appropriate data needed.