Article ID: 220824sab
Last Reviewed: July 6, 2023
The information in the article applies to:
Target Audience
This article is aimed at:
- Users of the PM7000 (or PM4000) who wish to use GPS time synchronisation.
Use of Terms
- The term GPS Receiver is used here to refer to the GPS module fitted in the PM7000.
- The instructions below refer to the PM7000 and apply equally to the PM4000.
Summary
GPS provides both a location and a precision time reference. When synchronisation is enabled in the PM7000 the time in the Logger is adjusted to match this precision time reference. This ensures data recorded by one or more PM7000s has identical time stamps allowing events captured in multiple Loggers to be easily compared. This application note gives information on how to enable the GPS receiver and interpret the information presented in the PM7000 user interface.
Before you start
You are going to need all of the following:
- A PM7000 (or PM4000) with the GPS option fitted and enabled. GPS is available in serial numbers 1286 and up.
- The PM7000 must be running firmware 2.027 or later.
- The PM4000 must be running firmware 1.003 or later.
- A computer or Android phone or tablet with the user interface utility PMScreen installed. Used to control and monitor the GPS receiver.
- A GPS antenna.
Quick Start Guide
- Plug the GPS antenna cable into the Logger and place the antenna with as clear a view of the sky as possible.
- Apply power to the Logger, either though the charger connector or V1 Line input.
- Connect to the Logger with PMScreen over USB, Bluetooth or Ethernet as appropriate.
- Navigate to the GPS Monitor screen via the Status button (see “Enabling…” below).
- Wait until the GPS Receiver has locked (you may need to adjust the antenna position).
- Check Logger time offset is small. If its bigger than 5 minutes, manually adjust the Logger time.
- If recorded time precision is important,
either:
a) Wait for the Logger to synchronise (may take a few minutes especially if the GPS receiver has not been used recently).
or
b) Manually adjust the Logger time to be within a couple of seconds. - Start the recording.
Enabling the GPS Receiver
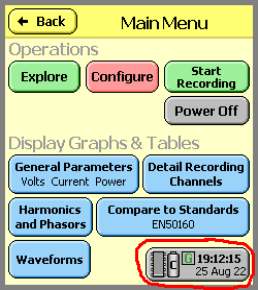
In a PM7000 with the GPS Receiver present, the status is shown on both the introduction and main menu screens as below:
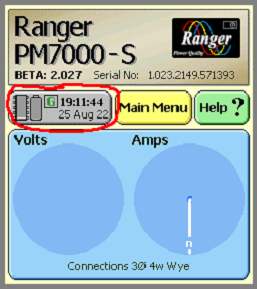
The button shows the GPS receiver status as follows:
1)  A red cross on a black “G” when the GPS Receiver is powered down.
2)  A flashing red “G” while the GPS Receiver is searching for satellites.
3)  A solid green “G” when the GPS Receiver is locked.
Click on the status button to show the status screen.
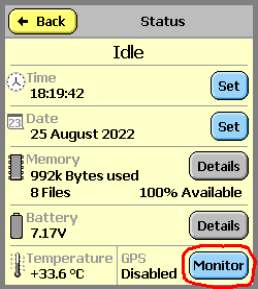
Click on the highlighted “Monitor” button to show the GPS Monitor screen.
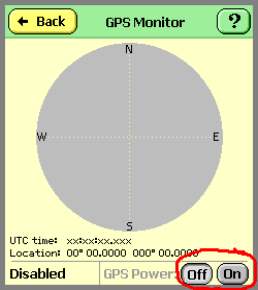
Use the two highlighted buttons to power on (or off) the GPS receiver.
Use this screen to fine-tune the position of the GPS antenna.
The GPS Monitor Screen
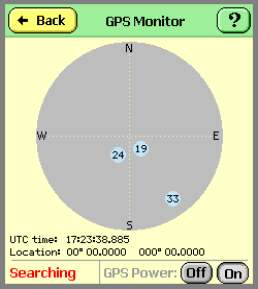
Here, the GPS receiver is on and searching for satellites.
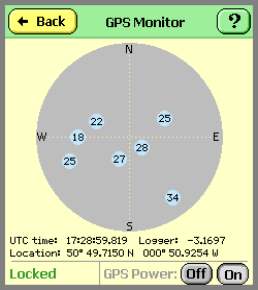
Here, the GPS receiver has found 7 Satellites and is locked.
The time in the Logger is 3.1697 seconds behind GPS time.
The Logger waits until any noise on the GPS time signal has settled. This may take a few minutes after which a correction is applied and the Logger synchronises to the GPS time signal.
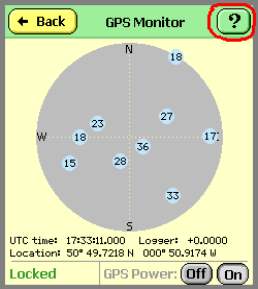
Here, the Logger has locked to the GPS time signal and the error is less than 100 microseconds.
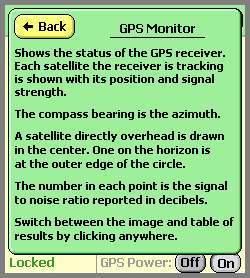
The highlighted help button shows this information screen.
Time zone effects
The GPS time signal is always in Coordinated Universal Time (UTC).
The Logger ignores whole hours in the time difference between UTC and the time in the Logger when synchronising. This ensures a Logger set to UTC + 5 (for example) will remain as UTC + 5.
Adjustment limits
There is a +/- 5 minute adjustment limit. If the offset between the GPS time signal and the Logger is greater than this, synchronisation is disabled.
Synchronisation while recording
If time precision is important throughout the whole recording it is recommended that the clock in the Logger be adjusted manually so that the recording begins close enough to GPS synchronism. Alternatively this can be achieved by waiting until the Logger time is synchronised to the GPS automatically before the recording is started. When recording the Logger synchronises to the GPS time signal by running its internal clock very slightly faster or slower, as required. The adjustment rate is limited to 3 seconds per hour – which means, if the initial time difference is significant, without manual intervention it could take some time for the Logger to reach synchronism with the GPS automatically.