Article ID: 110228sab
Last Reviewed: July 7, 2023
The information in this article applies to:
- Use of a PM7000 or other PM Series Logger on an Ethernet Network. The concepts given here also apply to other devices connected to an Ethernet Network.
- See also: APPNOTE: Connecting to a PM7000 over an Ethernet network for instructions on how to enter Ethernet settings into a PM7000.
Target Audience
This article is aimed at:
- Administrators of Ethernet networks where a PM Series Logger is connected.
Summary
This application note details the concepts and considerations when selecting the settings to use in a PM Series Logger that is to be connected to an Ethernet Network.
Before you start
You may need answers to the following questions about your computer and the network (assuming it is connected and working on the network to which the Logger will be connected).
1) What is your computers IP address ?
2) What is your computers Subnet Mask ?
3) How is your computer allocated its IP address ? This will either be DHCP or static.
4) If DHCP is enabled then what is the “address range” (see below) given out by your DHCP server ?
and possibly these two extra questions are needed too:
5) Are there any statically allocated clients ( for example a file or mail server ) ?
6) If yes then what are their addresses ?
This information does not go directly into the Logger software but is required to select a suitable IP address for your Logger.
How to select the network settings for a Logger
The network setup for a Logger consists of:
a) The use (or not) of DHCP (see below).
b) The IP address.
c) The Subnet mask.
The first choice to make is.
Either
Let the Logger be given its own IP address using DHCP,
The advantages are that this should “just work” even if the Logger is moved to another network.
There is no need to choose an IP address or a subnet mask.
The downside is the IP address may change when the Logger powers up, depending on the “lease time” (see below) set in the DHCP server.
or
Select a static address yourself.
This avoids the problem with the IP address changing.
The downside is you need all the information 1 – 4 above in order to make the correct choice.
Guidance on using DHCP or static address allocation
On a network where DHCP is not present static allocation must be used.
On a network where DHCP is present and the Logger is only installed for a short period, I would suggest using DHCP unless the answers to the four questions above are known or can be obtained easily.
On a network where the Logger may be installed for some time and the answers to the four questions above are known static allocation may be the best choice.
Guidance if static address allocation is used
A static IP address you choose will normally meet the following criteria:
1) The address must not in use by something else (or likely to be used) on the network.
2) The address will be in the same subnet ( see below ) as the computer that will access it.
3) If a DHCP server is present, the address should not be in the “address range” given out by the server.
Once the settings have been decided upon, the chosen setting(s) can be entered in the Logger using PmScreen as shown in the knowledge base article:
DHCP explained
DHCP stands for Domain Host Configuration Protocol. This is the protocol used by a network client (such as a computer or Logger) on a network to obtain an IP address automatically from a DHCP Server.
For more information on DHCP see Wikipedia article on DHCP
Lease Time explained
The DHCP Lease time is the time that the DHCP server “leases” the IP address to a particular client (Computer / Logger / etc) on the network. In most small office and home routers this is typically one to three days. You can tell what is it from the ipconfig /all command, in the output you will see text like this:
Lease Obtained. . . . . . . . . . : 22 December 2010 11:26:23
Lease Expires . . . . . . . . . . : 25 December 2010 11:26:23
The time between the Obtained and the Expired is three days so this is the lease time given out by the DHCP server.
Address Range explained
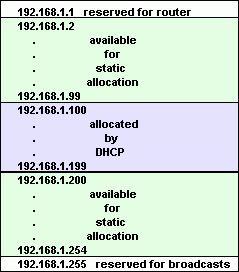
The DHCP address range (aka scope) is the range of addresses that the DHCP server will give out to clients requesting an IP address. For example on a typical small office or home network the address range will be something like 192.168.1.100 to 192.168.1.199. as shown in the image below:

In this example the address 192.168.1.1 is used by the router leaving addresses 192.168.1.2 to 192.168.1.99 and addresses 192.168.1.200 to 192.168.1.254 free to be manually allocated.
Subnet Mask explained
On most networks the subnet mask is used to determine if traffic for a destination can sent directly or must be passed to the router / gateway for onward routing.
For example, a network is using a subnet mask of 255.255.255.0. Machine 192.168.1.101 wants to send something to 192.168.1.102.
This communication will take place directly because there is no difference between the parts of the address when “ANDed” with the subnet mask, that is to say ( 192.168.1.101 AND 255.255.255.0) == ( 192.168.1.102 AND 255.255.255.0 ).
Alternatively if Machine 192.168.1.101 wanted to communicate with 173.194.37.104 then it would send the packet to the router for forwarding since ( 192.168.1.101 AND 255.255.255.0) is NOT equal to ( 173.194.37.104 AND 255.255.255.0 ).
