Article ID: 071005jdo
Last Reviewed: July 6, 2023
The information in the article applies to:
Target Audience
This article is aimed at:
- Users of the PM7000 who wish to download data to a USB flash drive.
The term USB flash drive is used here to refer to a memory device with a USB connector such as illustrated below. Other terms such as Thumbdrive or Memory Stick are also in common usage.
Summary
A USB Memory device (variously known as a USB Flash Drive, Jump Drive, Cruzer, USB Memory Stick etc) may be used to transfer data from the PM7000 to a computer instead of performing the download over the serial USB, Ethernet or Bluetooth links. This application note gives information on choosing a suitable memory device and what you can do with it.
Choosing a USB memory device
Memory device formatting
USB memory devices with 8, 16 and 32 GB drives are likely to come with suitable formatting, so these make a good choice for use with the PM7000 as they may not need to be reformatted. However, older (1 GB and 2 GB) drives often have small cluster sizes, and this can compromise performance.
For instructions on formatting (or reformatting) a device and specifying the cluster size, see our page on formatting a USB flash drive for use with the PM7000.
Temperature of Operation
Note that USB Memory Devices are not usually specified to work outside the normal PC operating temperature range (typically 0-40 deg C). We have had mixed fortune trying to operate devices during product temperature testing (-20 to 60 deg C). Some work and some don’t.
Automatic vs Manual copying of files
The key difference determining whether copying is automatic or manual is whether or not a USB device is detected as present by the logger at the end of a recording session. If there is a memory device detected, the PM7000 will automatically copy files into it. If not, the files will remain saved in the PM7000 to be copied manually at the disposal of the user.
Manual Copying of files
To copy recorded sessions from the PM7000 to the USB Memory Device, insert the memory device into the “host” slot in the PM7000 communications bulge towards the back of the unit.
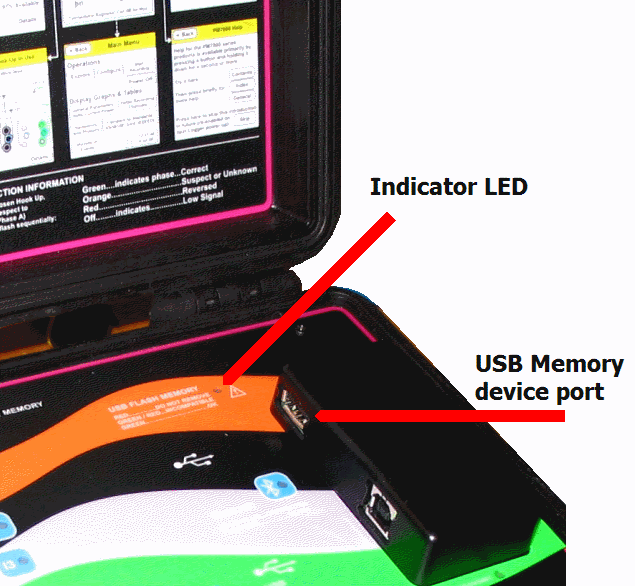
The Memory device will only slot in one way up. It is usually with the USB symbol ![]() uppermost.
uppermost.
With PMScreen running either on a PC or a PDA,
Stop the recording (you may only copy completed recordings) and allow the copy of wave capture data from RAM to internal Flash memory to finish.
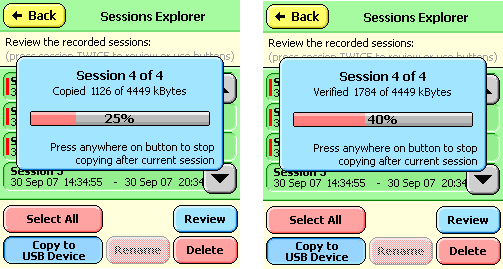
From the logger “Main Menu”, select “Explore” (a). This will display all the sessions held on the logger’s Flash Drive, and available for copy to the memory device (b).

(c)
To copy all of them, choose “Select All”. If you want to copy only one, select that session by pressing on it. If there are more sessions than fit on the screen, you may use the scroll buttons to bring the sessions of interest onto the screen, where you can select one by pressing on it.

If the system has recognised the Memory Device, the LED on the PM7000 front panel will have gone green, and the Button “Copy to USB Device” will be active (c). Select this button to start the copy process. Note the front panel LED will go red during the copy process and the MEMORY DEVICE SHOULD NOT BE DISTURBED while copy or verify is in progress. When copy is complete and verified the LED will become green again, and the device may be removed.
Note that the internal PM7000 USB interface circuit is energised only during the “Explore” mode, and all the time the LED is off or green, the Memory Device may be removed.
Automatic Copying of files at the end of a session
The USB Memory device may be inserted or withdrawn at any time provided the LED is not red.
An Automatic copy process occurs simply if a USB memory Device is detected when a recording ends automatically. Thus if a device is inserted during a recording, and is still in place at the end of a recording, any sessions in the PM7000 not already copied will be copied to the USB device. This does NOT apply if the recording is stopped by the user deliberately. It DOES apply if the recording shuts down for any other reason including time expiry, loss of power, or exhaustion of memory.
When a session has been copied to a USB device, an attribute is set against that session in the PM7000’s Flash Drive, and the session is shown with a red bar beside it in the PM7000’s explorer window (e.g. Session 2 has been copied, Session 3 has not).

The Auto-Copy process only copies sessions not previously copied, however the manual process can copy any session.
Note that the USB device is normally energised approximately 15 seconds before the end of a recording, so the green LED will typically come on at that point. It will go red during the copy process, go briefly green at the end and then turn off again.
Memory extension by Automatic Copying
By the simple expedient of selecting FIFO (recycling) mode, the PM7000 can effectively extend its memory up to the capacity of the memory device. FIFO is found under the Configure / Record Mode and Times menu.
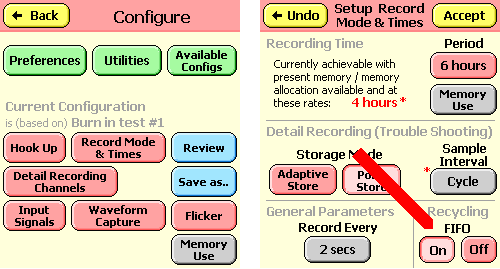
As discussed above a device present at the end of a recording causes a copy of any uncopied sessions into the device (provided it wasn’t user-terminated). If FIFO is in operation the PM7000 will re-start recording automatically when a previous one is complete, deleting space in its own memory if necessary, and all the time the system finds a memory device present at the end of each recording, that recording (initially “uncopied”) is copied to the device. This process can continue until the memory device is full.
The memory allocation in the PM7000 is suggested to be approximately 32 – 48 MB. This ensures that a recording just completed does not have to be deleted straight away (since there will be 80 – 96MB spare space – plenty of room for another file of 32 or 48MB), hence the new recording can start immediately the previous wave capture data has been saved, and does not have to wait while the file is copied. In this way the time lost between recordings is a few seconds maximum rather than the full file copy time.
File Structure created by the PM7000 on the USB device
The sessions are copied one at a time onto the USB device, together with the appropriate configuration, to create a single file for that session. The process is as follows:
The logger reads its own serial number, and creates (if it doesn’t already exist) a directory (folder) on the USB device with the name including the serial number. E.g. for files from logger serial number ending 0114, it would be PM7S0114.
The session file is placed in this directory, and automatically given a name similar to that used by Pronto for the datafiles read over the serial USB link. It also has the same form and the same file extension (.MDM). This naming arrangement is intended to uniquely identify the source, date and type of each file and to minimise the likelihood of file name conflicts.
The PM7000 first checks for the existence of the appropriate directory on the USB drive (creates it if necessary), and looks for files already in it with the same date. The file naming convention is YYMMDDXX.mdm, where YY is the year (e.g. 06 for 2006), MM is the month, and DD the day of the month. XX is a suffix which begins at 00 for the first file of the day, and counts upwards for successive files. Thus the first file to be copied on 2nd December 2006 is named 06120200.mdm, and the second 06120201.mdm.
If the logger finds files of the same date already present it uses the next available index. In the event that there are more than 100 files copied from a single logger during a day, the index XX is extended to use the least significant of the DAY digits. Thus the number sequence always advances with later files saved.
Importing files into Pronto
The simplest way to import the .mdm files into Pronto is to have Pronto already open on your PC, then to select them (the .mdm files on the USB device) with Windows Explorer, and drag and drop them into Pronto. Pronto will automatically import them as though they were from the direct serial connection to a logger. You have the same opportunity to select suitable projects etc in which to place the data, and for multiple sessions from the same logger, you may use the AutoSave function to append new data to old.
Specifying Start and Stop times
A tidy way to obtain recordings starting and stopping at convenient times is to use the Delayed Start facility. Choose e.g. 24 hours or 7 days for the recording time, and use “setup Delay” (a) to set a delayed start to occur at a precise future time (b).
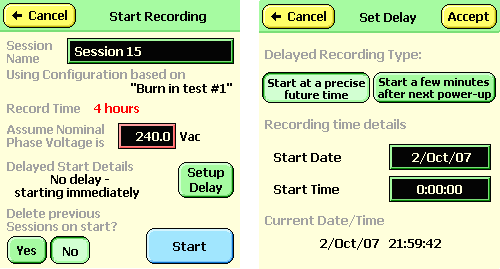
Figures (a) and (b)
Arrange the start time to be the next convenient time IN THE FUTURE, e.g. the next midnight (c). When you “Accept” that, the “Start” (recording) process becomes “Start Timer” (d).

Figures (c) and (d)
Then the first recording will run midnight to midnight, and the second recording, though starting a second or two after midnight, will nevertheless run to midnight again. (In FIFO mode a new recording Stop Time is set by consideration of the “desired” stop time based on the previous Stop Time plus the chosen “Record time”. Thus the short period between recordings does not cause a gradual drift in recording start and stop times.)