Article ID: 161201sab
Last Reviewed: July 7, 2023
The information in this article applies to:
- PMGateway version 3.3.2 or later when used to provide remote access to one of the Power Master Loggers.
- NOTE: PMGateway was previously called PmRemoteAgent.
Target Audience
This article is aimed at:
- All users of PMGateway who wish to extract data or remotely control a Power Master Power Quality Analyser.
Contents
- Before You Start
- Step 1. Install PMGateway onto the Android Device
- Step 2. Launch PMGateway
- Step 3. Setup and Test the Connection between PMGateway and the Logger
- Step 4. Setup and Test the Connection between PMGateway and an Email Server.
- Step 5. (Optional) Setup and Test the Connection between PMGateway and a Dropbox account
- Step 6. (Optional) Setup and Test the Connection between PMGateway and an FTP server
- Step 7. (Optional) Setup and Test the Connection between PMGateway and another Device using the SMS Command Set
- Step 8. Perform a Complete System Test
- Step 9. Synchronise Logger Time with Time Server
- Step 10. Start the Logger Recording and Start PMGateway Polling for New Data to Send
- Known Issues and Precautions
- See Also
Summary
PMGateway is an application that runs on a phone or tablet running the Android operating system. It enables a user to communicate remotely with any Power Master Logger that has Bluetooth.
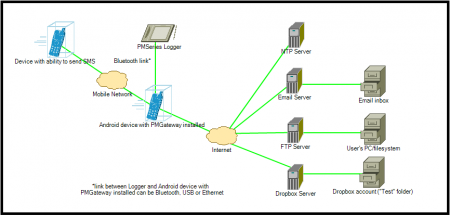
Communications include timed remote data downloads and active control of a Power Master Logger. The user can setup automatic data download to their email inbox whilst also being able to send commands remotely back to the Logger.
Available to use with any Power Master Analyser with Bluetooth, the system uses a ‘Gateway’ mobile phone. Remote control is achieved by sending an SMS message to the phone loaded with the PMGateway App. PMGateway then interprets the SMS message and performs the command requested through Bluetooth communication with the operating analyser. The ‘Gateway’ mobile phone collects data from the Analyser and sends that data and other information via emails directly to mobile phones, tablets and PCs over WiFi, 3G/4G or Bluetooth.
Screen-shots shown below are from a phone with a 4.5 inch screen running Android 8.0, They will differ somewhat on a device with a larger or smaller screen or running a different Android version.
Before You Start:
1) An Android device into which PMGateway will be installed which will be left near the Logger.
This could be a phone, a, tablet or an embedded system running Android.
2) A copy of PMGateway installed on the Android device.
PMGateway MUST be at least 3.3.2. Certain later Phones (the Google Pixel 7 for example) require 4.0.0 or later.
3) A Power Master PM1000, PM2000, PM3000 or PM7000 with a Bluetooth interface.
4) For remote control over SMS, a device is required from which to send SMS messages.
Step 1. Install PMGateway onto the Android device
1) Installing PMGateway on Android is very similar to the installation of PMScreen; for reference read the instructions in this application note:
APPNOTE: Installing PmScreen on an Android Device
2) Turn Off Battery Optimisation for PMGateway.
Android 8 and later. This may be required to avoid data errors when transferring files between the Logger and the Phone.
On recent Android versions, this is under SETTINGS – APPS (all apps) – PMGateway – BATTERY – Unrestricted.
On earlier Android versions, this is under SETTINGS – Apps and Notifications – Special App Access – Battery Optimisation.
Step 2. Launch PMGateway
After installation, launch PMGateway by clicking on the icon
![]()
PMGateway will display the main screen below:
Step 3. Setup and Test the connection between PMGateway and the Logger
It may be convenient to perform this step before going to site to connect to the Logger.
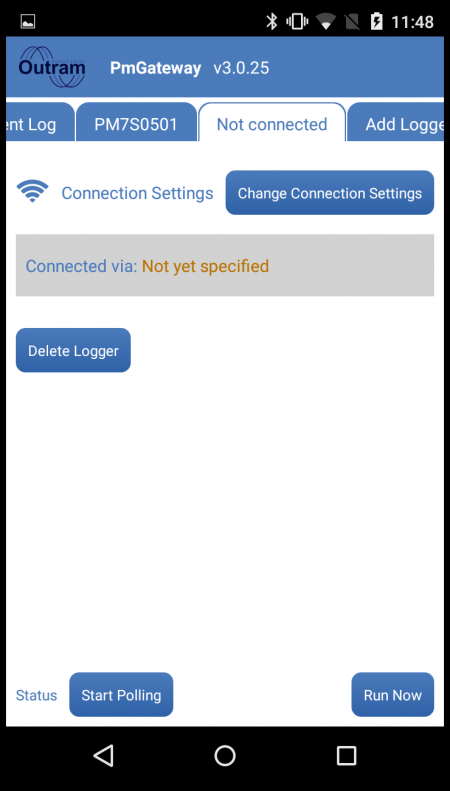
1) On the main screen, click on the tab titled “Add Logger” (this can be found by scrolling the tab bar to the right).
Click on the tab titled “Not connected”. This screen will be shown:
2) Click on “Change Connection Settings”. This screen will be shown:
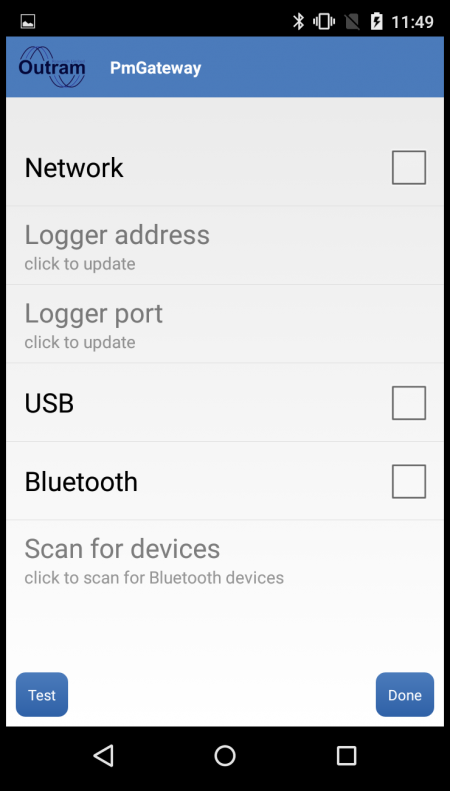
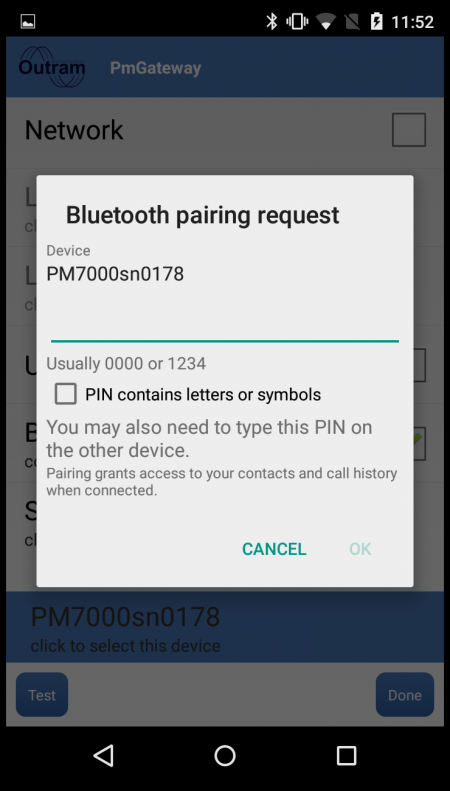
3) For a Bluetooth connection, set the checkbox (you may be prompted to turn on Bluetooth) then click on “Scan for devices”.
Detected devices will be displayed in the list as shown in this example:
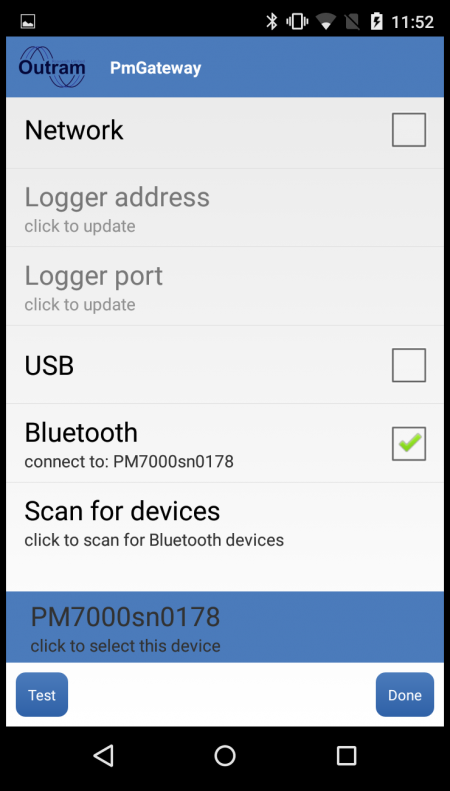
4) Select the Logger to which you want to connect, and click on “Test”. This tests that the connection can be established with the Logger (you may be prompted to enter the Bluetooth PIN at this point).
5) Look for the message Successfully connected to logger PM7Sxxxx as shown.
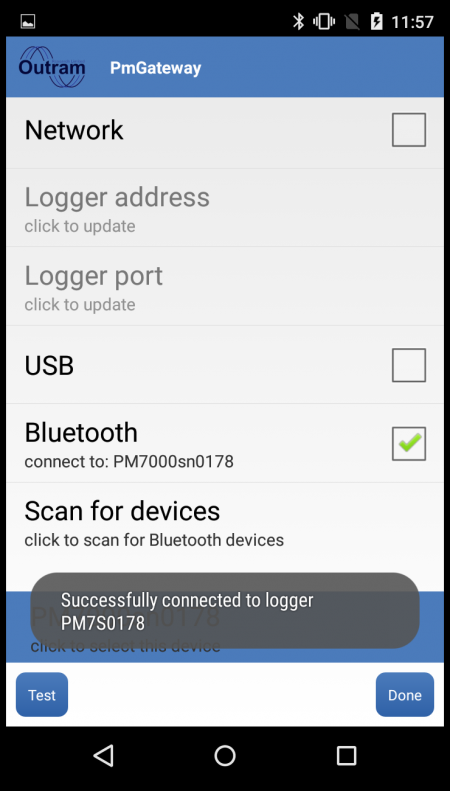
6) Finally click on “Done” to go back to the Logger connection screen then click on “Settings” to go back to the main screen.
Step 4. Setup and Test the Connection between PMGateway and an Email Server
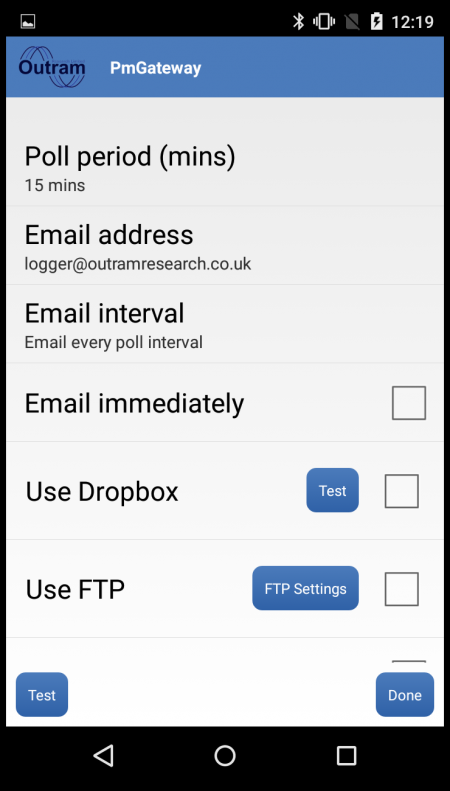
1) On the main screen click on “Change Email settings”. This screen will be shown:

2) Click on “Poll period” to select how often the phone checks the Logger to see if there is any new data. The default of 15 minutes is a good compromise between minimising battery consumption, and minimising the amount of time between the end of a recording and data retrieval.
3) Click on “Email address” and enter the email address to which you want data to be sent as shown in this example:

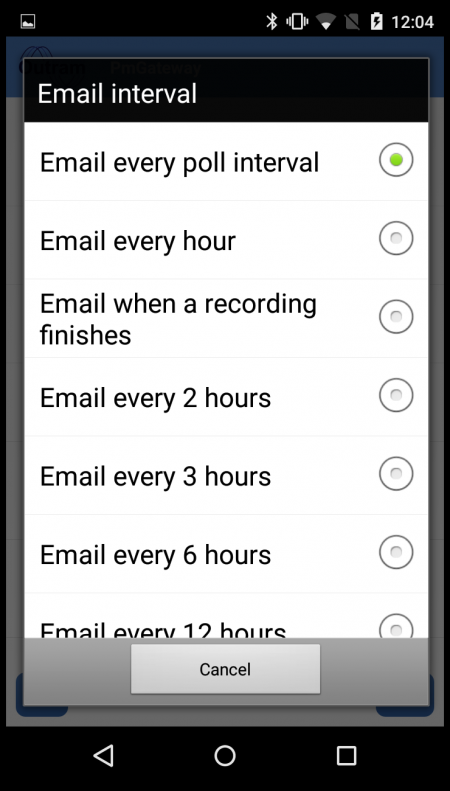
4) Click on “Email interval” to select how often you want emails sent to the inbox as shown.
For Email every poll interval, email will be sent regardless of whether new data is available or not.
For Email every hour/every 2/3/6/12/24 hours, again email will be sent regardless of whether new data is available.
For Email when a recording finishes, emails will only be sent when new data is available.
If you are intending to run the test detailed below in step 5, select Email every poll interval.
For normal use, we recommend selecting either the option to poll every hour or when a recording finishes as you prefer.
5) Test the entered email address by clicking on “Test”. PMGateway should show the message as below:
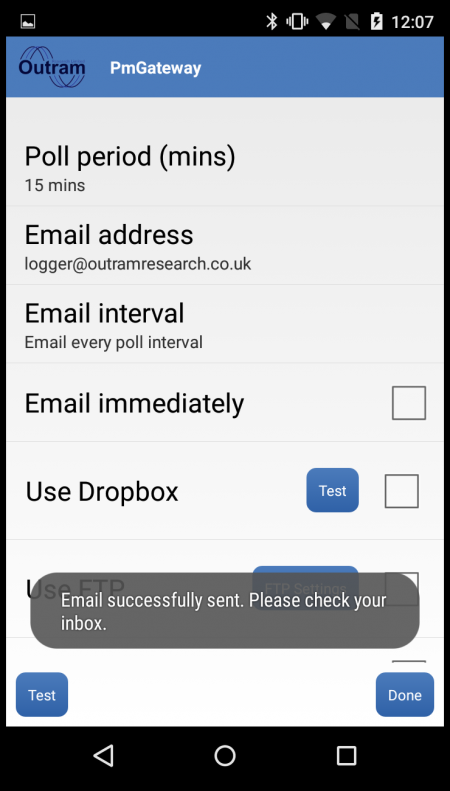
6) Check your inbox to verify the message was received (this may take a few minutes depending on network load).
TIP: try not to send multiple messages over a short period as this may trigger the spam filter for your inbox (depends on the server configuration).
7) Click on “Done” to save changes to the email settings and return to the main screen.
Step 5. (Optional) Setup and Test the Connection between PMGateway and a Dropbox account
This step is only necessary if you want PMGateway to transfer data extracted from the Logger to a Dropbox folder rather than over email (Dropbox is a cloud storage service, and can be used to sync data across multiple devices).
Ensure the phone has Wi-Fi connectivity before commencing.
1) On the main screen, click on “Change Email Settings”. This screen will be shown:

2) Tick the box marked “Use Dropbox”. If you have never used a Dropbox account with PMGateway before, ticking this box will bring up a web browser page to allow you to sign into your Dropbox account, as shown below:
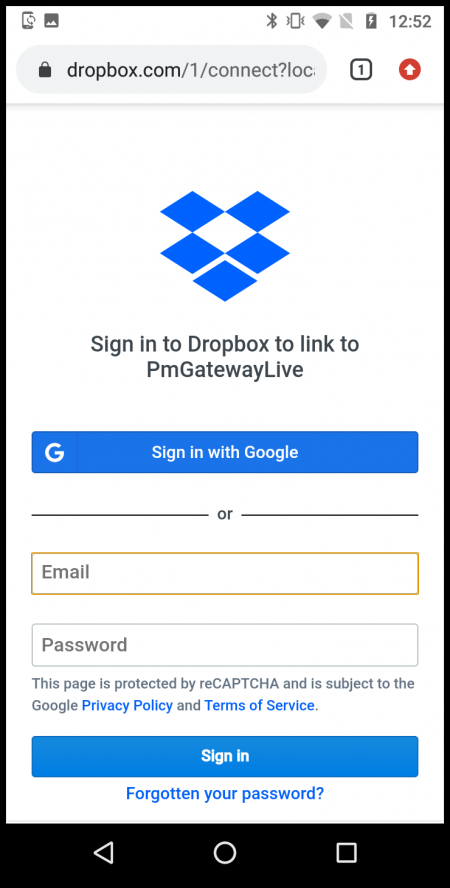
3) Enter the email address and password of your Dropbox account and click “sign in”.
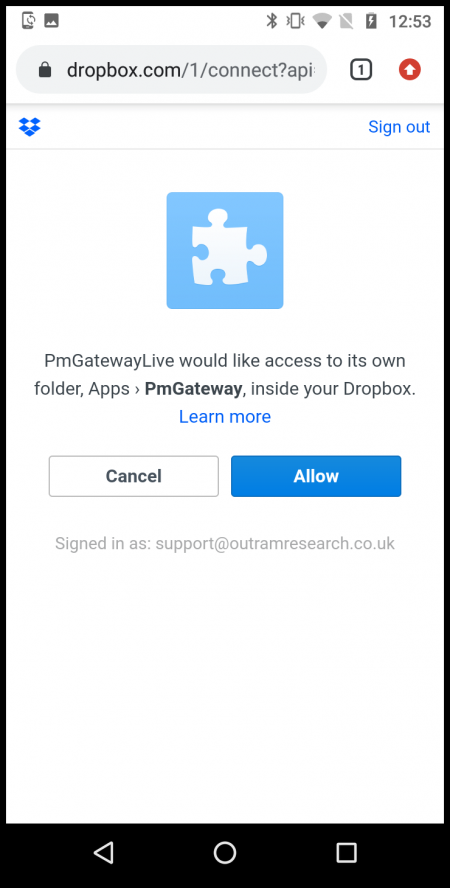
4) The following screen should come up. Click “Allow” to allow PMGateway access to your Dropbox account.
5) The pop-up window should now close by itself, and PMGateway should now reappear. Click “Test” to upload a small test file, called Upload.txt, to the Dropbox account.
6) If the test is successful, you should see the message pop up as shown below:
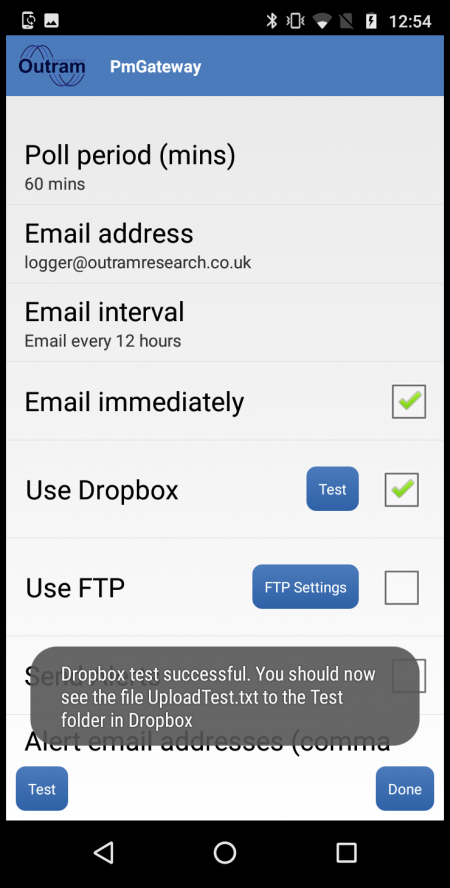
7) In your Dropbox account, there should now be a folder called “Test”, which you can find inside “PMGateway”, inside “Apps”. To continue to have your files uploaded to Dropbox, keep the box checked.
Step 6. (Optional) Setup and Test the Connection between PMGateway and an FTP Server
This step is only necessary if you want PMGateway to transfer data extracted from the Logger to an FTP/FTPS server rather than over email.
1) On the main screen, click on “Change Email Settings”. This screen will be shown:

2) Set the “Use FTP” checkbox then click on the “FTP Settings” button. PMGateway will display the screen below:

3) One by one, click on each of “Server Address”, “Server Port”, “Username” and “Password” and enter the details for the server you want PMGateway to upload files to. For Internet FTP Servers, for security reasons, use the FTPS protocol by setting the check box.
4) Enter the root directory into which PMGateway will save recordings. PMGateway will create this directory if it does not already exist on the server. Recordings from an individual Logger will be placed in a sub-directory below that directory. For example if the root directory is “pmgateway” then recordings from PM7000 serial number 678 will be saved to “/pmgateway/PM7S0678/” .
5) Click on “Test” and PMGateway will test the connection to the FTP server by uploading (then removing) a small text file.
6) Click on “Done” to save changes to the FTP settings and return to the email settings screen.
Step 7. (Optional) Setup and Test the Connection between PMGateway and another Device using the SMS Command Set
A feature of PMGateway is its ability to be controlled remotely by SMS. This section will give instructions on how to setup and test the connection between PMGateway and another device. To explore the range of commands that are possible through SMS, see the SMS command set.
To make use of this feature, another device is needed (referred to as “control device” in the following instructions), so that SMS messages can be sent to the device running PMGateway (referred to as PMGateway device). The control device can be anything that can send an SMS, such as a phone, tablet, or smart home device.
NB: the PMGateway app can only understand SMS messages specifically, and will ignore incoming messages that are in any other format.
If you are experiencing problems where a text has arrived on the PMGateway phone but the command doesn’t work as expected, it may be because the message isn’t being sent in SMS format. See Known Issues and Precautions at the bottom of the document for further explanation and possible solutions.
Manually authorise access through PMGateway
You will need access to the device with the PMGateway app for this step.
1) Click on the tab marked ”Settings”, then click on “Change SMS settings”. You should see the following screen:
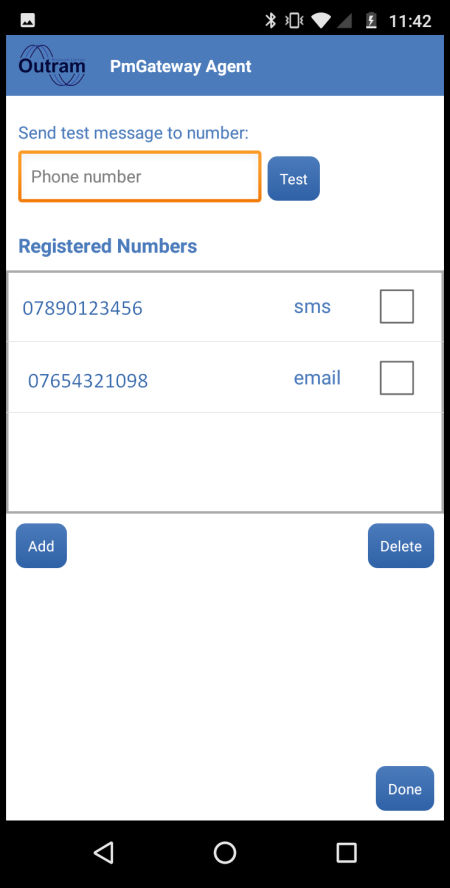
2) To send a test message to the control device, enter its phone number into the bar at the top of the screen, and press “Test”.
3) To authorise a number to control PMGateway, press “Add” in the bottom left corner. Type the phone number of the control device into the box.

4) You can also select the default response type in this stage by clicking on the drop-down menu and selecting your desired option.
5) Finally, click “Add” to authorise the number.
To manually delete the number, click Settings > Change SMS settings and select the tick box next to the number under “registered numbers” , then press “Delete”.
To delete the number via SMS command, send the message “.logout” to remove the number from the list of authorised numbers. NB – this will be the last command able to be sent from that number until the number is registered again.
Step 8. Perform a complete system test
This step is designed to test the entire path of data through the PMGateway system, first from the Logger to PMGateway, then from PMGateway via the Internet to the server hosting your email inbox.
To minimise the time taken for the test, the Logger should be empty and not recording, although a single small recording of no more than a couple of 100 kB won’t impact the time too much.
1) On the main screen click on “Change Email settings”. This screen will be shown:
2) Click on “Email Interval” and set the interval to Email every poll interval. For the duration of this test, use this setting only as it will enable emails to be sent as frequently as possible.
3) Click on “Done” and return to the main screen.
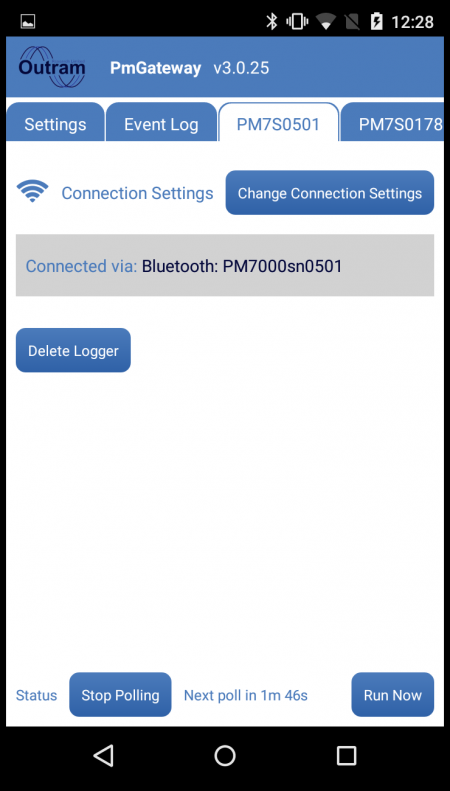
4) On the main screen click on the Logger tab to go to this screen:

At the bottom of the screen, click on “Run Now”.
5) The Bluetooth indicator LED on the Logger will go solid to indicate a connection has been made, the test is complete once the Bluetooth LED goes back to flashing normally. Check your inbox for a status message.
6) Go back to the main Settings screen then on the Email Settings screen return the email interval to the final desired setting.
Step 9. Synchronise Logger Time with an Internet Time Server
1) Click on the tab marked “Event Log”.
You should see the below screen:

2) Tick the box marked Update logger time.
3) Type the address of your desired Network Time Protocol (NTP) server into the box marked NTP server.
4) You can test and set the logger time to that of the NTP server by clicking either “Test” or “Set” which are located beside this box.
Step 10. Start the Logger Recording and set PMGateway Polling the Logger Looking for Completed Recordings
1) Start the Logger recording in the normal way using the PmScreen app.
2) Ensure the Logger is recording.
3) On the main screen click on the Logger tab to go to this screen:

At the bottom of the screen, click on “Start Polling”.
4) Check the status text indicates the time to the next poll as below:
.
Known Issues and Precautions:
1) Ideally, start the Logger with its memory empty. If there are any superfluous recordings left over in the Logger, PMGateway has to download these first which will delay the time before new data is extracted.
2) As with any wireless communication method interference is possible, the following precautions should help reduce the risk of problems.
- a) Position the Logger and phone away from sources of Radio Frequency (RF) noise – for example, large electrical machinery or IT equipment.
- b) Keep the Logger and phone away from highly active Wifi or Bluetooth devices, as these share the same frequency. In particular, a Wifi access point or router that sees significant traffic will cause problems.
- c) It is recommended to turn off the WiFi or 3G/4G connection on the phone whenever each are not in use, as this helps conserve power.
3) Try and ensure the phone power supply is not going to be disconnected by other site visitors needing a power point.
4) Issues related to the SMS command feature – if you are experiencing problems whereby the PMGateway app seems unresponsive to texts that are being received by the PMGateway device, it may be because the control device is sending the texts in RCS format (as opposed to SMS) in order to be able to send them over WiFi instead of a cellular network.
To solve this problem, one option is to turn off chat features in the messaging app you are using. In most Android phones this can be done by entering the messaging app you are using and clicking the three dots to bring up the Options menu. From here click Settings > Chat features then click the toggle next to “Enable chat features” which will turn off the ability to use WiFi/ data for messaging, and texts will default to being sent in SMS format.